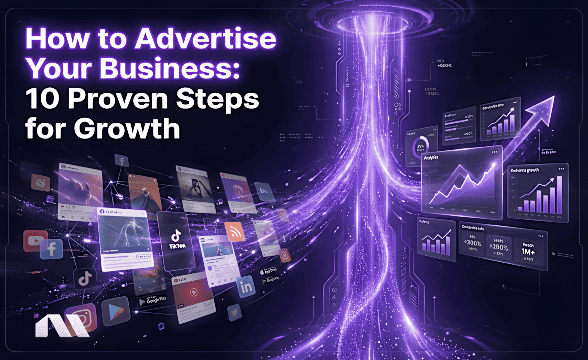
Think Your Ad Strategy Still Works in 2023?
Get the most comprehensive guide to building the exact workflow we use to drive kickass ROAS for our customers.


You’ve spent enough time sitting on your brilliant business idea.
It’s time to unleash it on the world by creating a Facebook Business Page so you can start selling to new potential customers.
Some people say Facebook is dead, but I disagree, as do the statistics.
With over 3 billion monthly active users, Facebook dominates the field compared to other social networks.
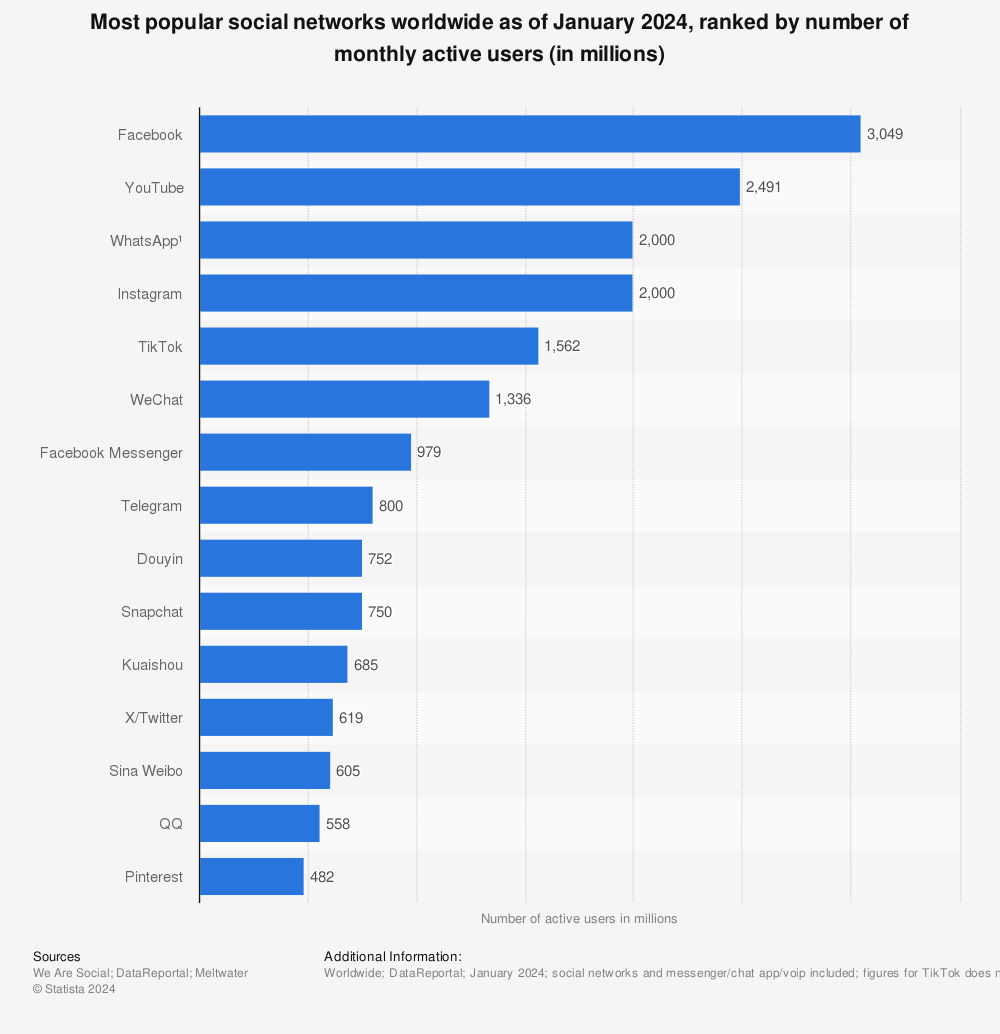
Creating a Facebook Page is a simple and cost-effective way to set up shop on the platform – you get more eyes on your business and more revenue to ensure you get a slice of that enormous pie.
But first, let’s go over the basics of how it all works.
A Facebook Business Page is a public profile for businesses, organizations, public figures, and brands to promote themselves across Meta’s network.
While personal profiles can be private, Pages are public. A public page means that Google may index your page, making it more discoverable.
Facebook is where people search to learn more about a business, and a Facebook Business Page is your storefront. You can customize your Page with cover photos, a profile picture, and preferred contact information and add your website or store links.
A Facebook Business Page lets you create posts and other content to intentionally connect with your target audience and followers.
Aside from tapping into an endless list of audiences, a Facebook Business Page can become another arm of your business. Here are some of the best features of setting up a Facebook Business Page:
Setting up a Facebook Business Page is easy and doesn’t take long.
Log into Facebook.com and select the profile you want to link to your new Page. Or, if you want to create a new profile to connect it to, click “Create new account.” Follow the instructions and log into your account.

From the “Home” page, head to the menu on the top right to find “Create,” then click “Page.”

In the popup that appears, you can start entering your business details. You need a name and a category to continue - you can choose up to three categories that best describe your business. You can do this now or come back to complete it later.

Next, you should enter more details, including your website, business phone number, business email address, and physical location. Click “Next” when you’re finished.

In the next step, you can add a profile picture and a cover photo to your page to add your brand visuals.

Here, you can also add your call-to-action button to your profile. You can choose the one that makes the most sense for your business.

If you have a business phone with a WhatsApp for Business account, you can connect it in this step. Doing so adds WhatsApp as an option for your call-to-action button or as a destination in your ads. You can skip this part and come back to it later if you wish.

It's time to build your Page audience by inviting friends and connections to like it. You can skip this step if you haven’t completed the other sections. It’s better to invite people once your business Page info is populated and appealing before you share it with the public.

In this step, you must choose the notification settings for your Page and click “Done.”

Yes, you just clicked “Done,” but there is still more to do. Your Page has been created and may look like the one I made for this article here.
The menu highlighted by the red box has links to your Professional dashboard, Insights, the Ad Centre, a link to create an ad, and your Settings. Under “More tools,” you’ll find the Leads Centre and Meta Business Suite.

The Page setup wizard is highlighted in the blue box to show what you still need to do to set up your Page correctly. By adding all this information, you optimize your Page because it shows Meta that it is complete, automatically making you more discoverable.
Lastly, the “Manage Page” button the arrow points to at the top right takes you to your Professional dashboard, where you can work on your Page.
Once you’re happy with the information and visuals on your Page, you should review the Privacy tab in the Settings section. This section allows you to set what people are allowed to do on your Page, such as whether they can post to your feed and whether you accept reviews.
The best way to do this is to run down the menu on the left from top to bottom because Meta likes to move things around often. This way, you can ensure you’ve added all your details and have gone through all your options.

Next, you should connect your Instagram account to your Facebook Business Page. I wrote an article explaining exactly how to link your IG to your FB if you need a step-by-step. Otherwise, head to “Linked accounts” and follow the prompts if you feel like you’ve got this. If you don’t have an Instagram account yet, here’s a guide on how to create one.
Interesting read:
- How to promote on Instagram
- Types of Instagram ads
If you've completed the previous steps, you're ready to post. It’s time to share content with the world to help your next customers find you.
I recommend uploading and scheduling your content using the Planner in Meta Business Suite. From your Page settings, you can post Reels, Stories, posts, and ads across all the connected platforms, such as Instagram and WhatsApp.
You can also post directly from your Page or Instagram account and choose to post to your linked accounts, but I prefer using the Planner. It allows you to see all your content in one view.

When you click “Create post,” a popup will appear where you can choose the accounts to post to from a list, upload your content, enter your caption, and schedule your posts.

As you add more details, the preview will change to show you how your post will look.
Between the business tools Meta provides and the tips below, you can grow your business on Facebook no matter your budget.
Now you’ve created your shiny new Page, you can’t just leave it. Here’s what you should consider when managing a Facebook Business Page:
Here are answers to the most common questions about setting up your Facebook Page.
Adding another admin to help manage your Facebook Business Page is easy. Head to the “Professional dashboard,” scroll down the left menu until you find “Page access,” and click it.

Here, you can add another admin or assign task access to people to help with specific Page tasks, such as responding to comments or posting content.


Facebook unpublishes and deactivates your Page immediately but will only permanently delete it in 30 days.
Yes, it does. You need a personal Facebook account to create and manage a Page, but it won’t be publicly associated with your profile unless you choose.
Meta does this to keep things clean and tidy by not mixing business with pleasure. It also helps when you need to assign access to your Page to other people. By setting it up this way, you can easily assign access to individuals.
Yes. Creating a Facebook Business Page costs nothing unless you hire a professional to do it for you.
Easy. Log into your personal Facebook profile and click the menu button with the nine dots next to the “Messenger” icon at the top right of the page. Then click on “Page” in the Create column to start the process outlined earlier in the article.

Yes, you can. Facebook designed Pages with this in mind, knowing some agencies and freelancers set up Business Pages for their clients. It’s important to remember that the client’s Page remains their business asset once it’s been delivered and you’ve been paid for your services.
The sooner you set up your Facebook Business Page, the sooner you can tap into new audiences to build a revenue stream. And, with Madgicx by your side, you can launch your first campaign in just a few clicks and use the AI Marketer to help optimize your ads. Facebook ads sorted. Try Madgicx today.
Advertising on Facebook is easier than ever before with Madgicx. Start your first campaign in no time at all with the AI Marketer guiding you along the way. No experience required!
.png)
I use my agency experience in digital marketing and paid advertising to help business owners and advertisers navigate the tech landscape with my content.