Before you can run Facebook ads, you need a Meta ad account. This guide walks you through the setup process step by step, so you can get started ASAP.
Keeping up with Meta’s ever-changing interface can be challenging (seriously, they probably updated something while you read this). This guide will walk you through creating a Meta ad account in 2025, setting up your Meta Business Portfolio, linking your Facebook and Instagram accounts, configuring the Pixel and Conversions API, and managing permissions. Whew! We’re helping you cover all bases so you can keep up with Meta.
Let's get started!
What is a Meta ad account?
A Meta ad account is your control center for creating, managing, and measuring ad campaigns across Meta's family of apps and services, including Facebook, Instagram, Messenger, and the Audience Network.
Think of it as your advertising command center – where you'll set budgets, create audiences, design ads, and track performance.
But here's the critical part: distinguishing between a Meta ad account and a personal Facebook account or Business Page is key—it’s an independent, purpose-built space solely for handling ads.
Your Meta ad account includes several key components:
Payment methods: This is where you add your credit card or other payment information to fund your advertising campaigns.
Account settings: Here, you can manage settings like account name, time zone, currency, and user permissions.
Ad account users: These users include anyone you've granted access to—like team members, advertisers, or agencies—who help manage your ads.
Ad account roles: Different roles (admin, advertiser, analyst) determine what level of access each user has. Admins have complete control, advertisers can create and manage ads, and analysts can view performance data without making changes.
Campaign assets: This includes your campaigns, ad sets, ads, audiences, and creative assets.
Here's why having a well-set-up Meta ad account is crucial:
Reach: Meta platforms have billions of active users. Facebook and Instagram have over 5 billion active users combined. That's a lot of potential customers!
Targeting options: Meta's advertising platform offers incredibly detailed targeting options, allowing you to reach the right people based on demographics, interests, behaviors, and more.
Cost-effectiveness: Meta advertising can be a highly cost-effective alternative to traditional channels, giving you complete control over your budget. For instance, one report found that Facebook’s average cost per click (CPC) ranges from $0.26 to $0.50, while Instagram’s CPC can be as low as $0.00 to $0.25. Meanwhile, the cost per mille (CPM) on Facebook typically falls between $1.01 and $3.00, with Instagram’s CPM ranging from $0.00 to $4.00.
Measurable results: Meta's robust analytics tools allow you to track exactly how your ads are performing so you can optimize your strategy based on real data.
Multi-platform advertising: With a single Meta ad account, you can create ads that appear across Facebook, Instagram, Messenger, and the Audience Network, significantly expanding your reach without additional account setups.
Retargeting capabilities: You can create custom audiences based on website visitors, app users, or customer lists, allowing you to reconnect with people who have already shown interest in your business.
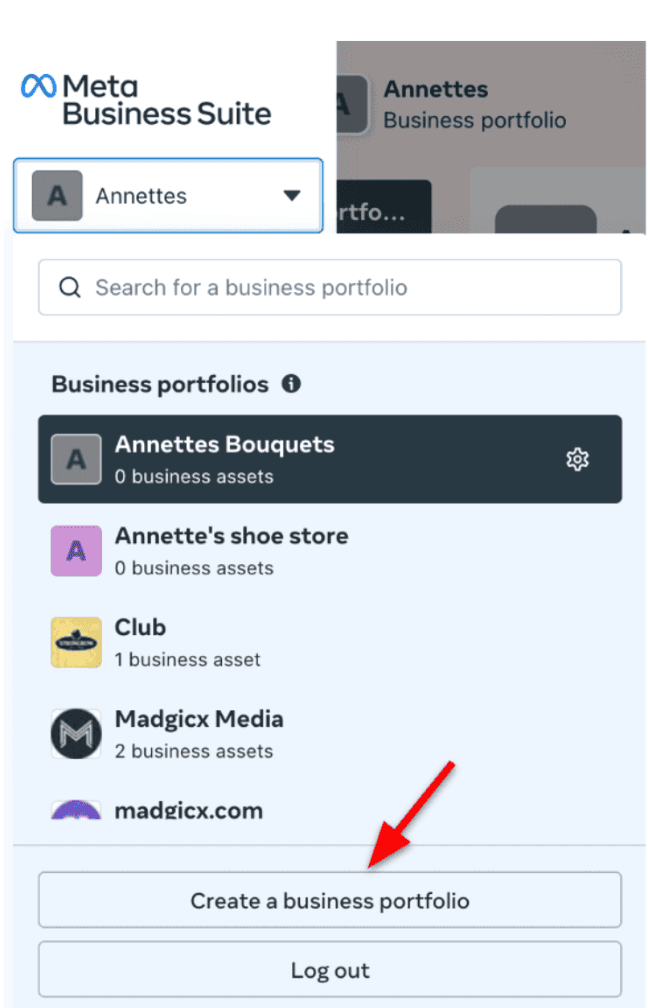
How to set up a Meta Business Portfolio
Before creating a Meta ad account, you must set up a Meta Business Portfolio. This overarching name houses all your business assets on Meta platforms.
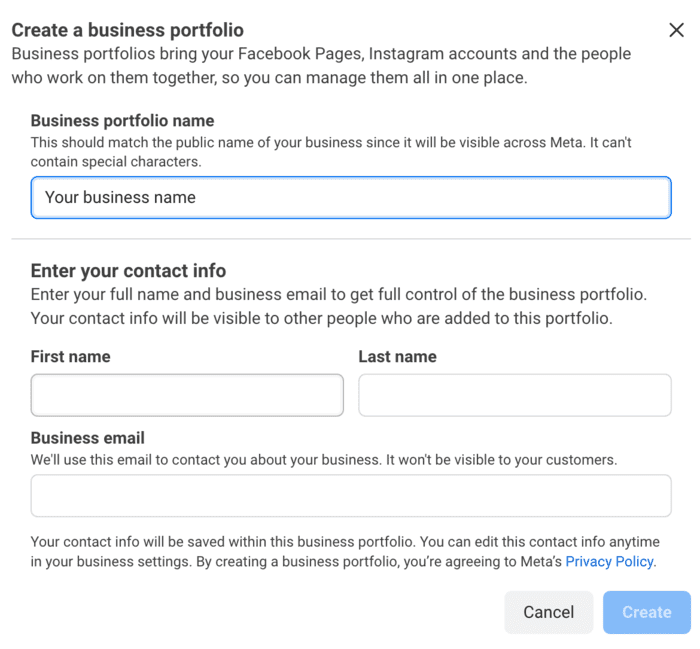
Enter your details, like your business name, name, and email address, to set up your account. Your Business Portfolio will be your central hub for managing key business assets like Pages and ad accounts. Click ‘Create’ afterward.
🛎️ This is also a great time to create an Instagram business account if you haven’t already. A professional account helps boost brand awareness, engage your audience, and drive sales—you can sell directly on the platform with an Instagram Shop.
This page requires you to add your business details. Scroll further down to confirm your email address as well.
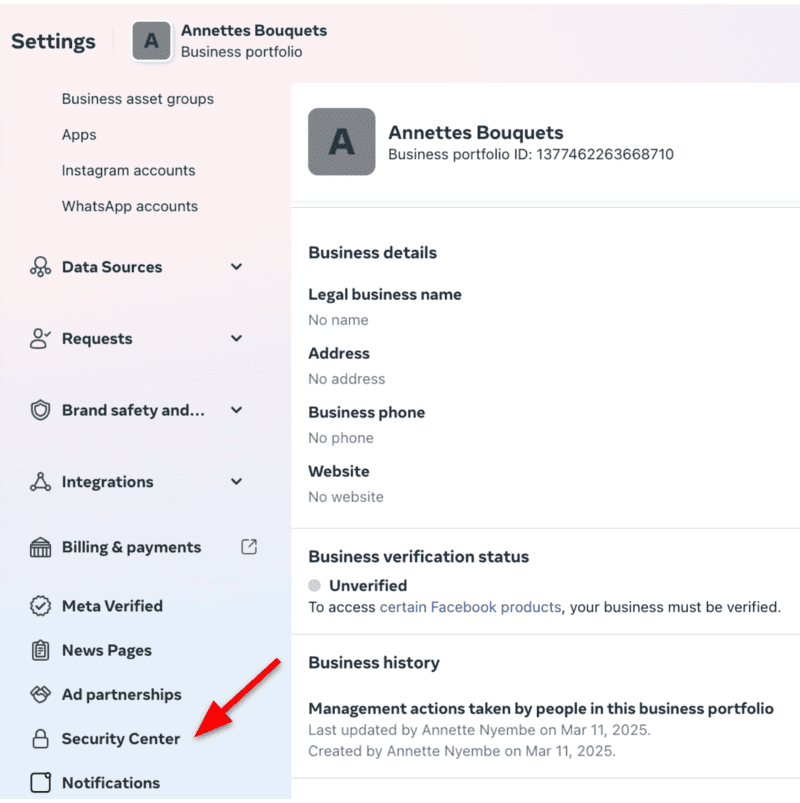
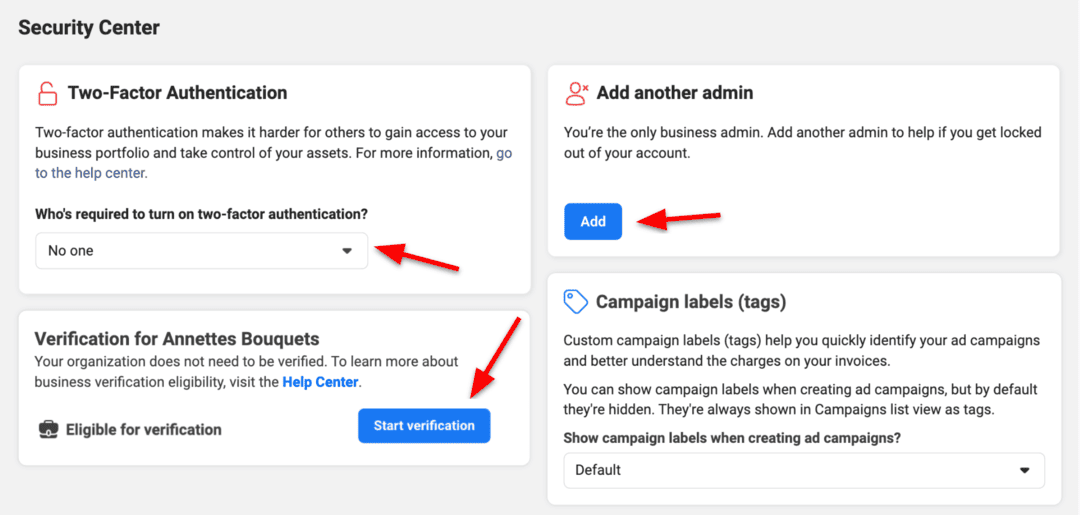
Navigate to the Security Center on the left side panel to ensure your business is verified.
Look for the ‘Start Verification’ button. Verified accounts are less likely to face random campaign blocks or account bans, making it a strategic move for businesses. For security purposes, Meta requires Business Portfolios to use two-factor authentication. Follow the prompts to set this up. On the right-hand side, you can add another admin to help if you get locked out of your account.
Connect your Facebook Page to the Business Portfolio
Once your Meta Business Portfolio is set up, the next step is to ensure your key assets, like your Facebook Page, are linked to it. This connection is essential for running ads and managing your campaigns effectively:
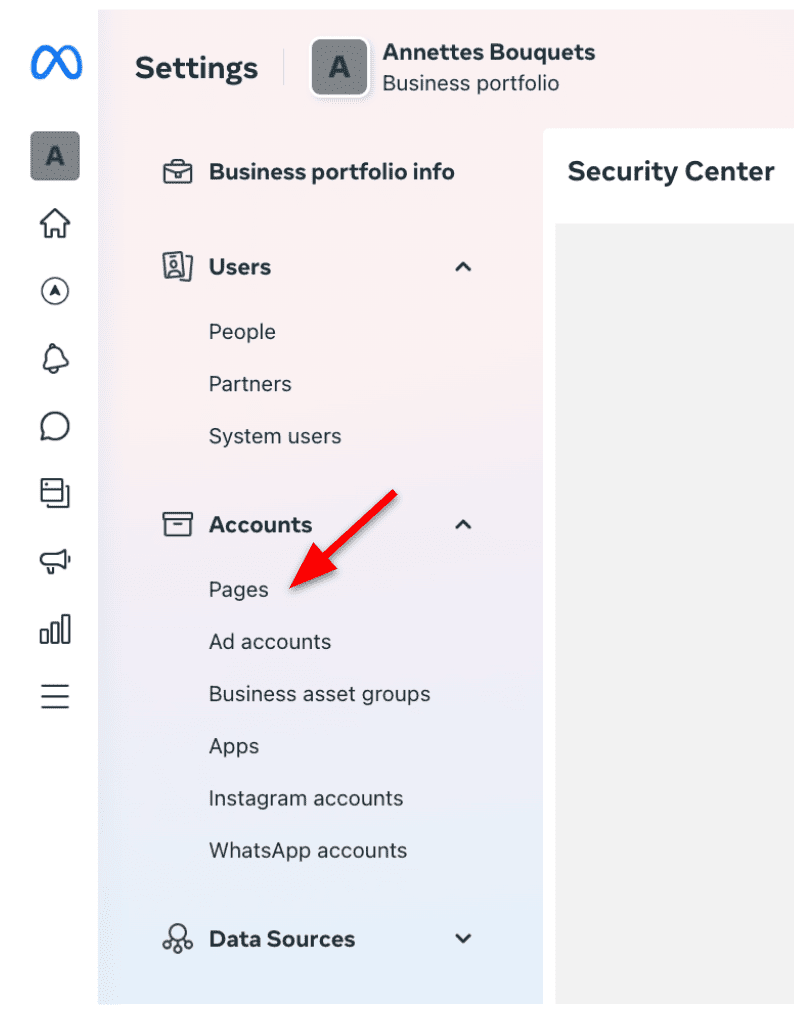
It’s time to add your Facebook Page. On the left-side panel, navigate to ‘Pages.’
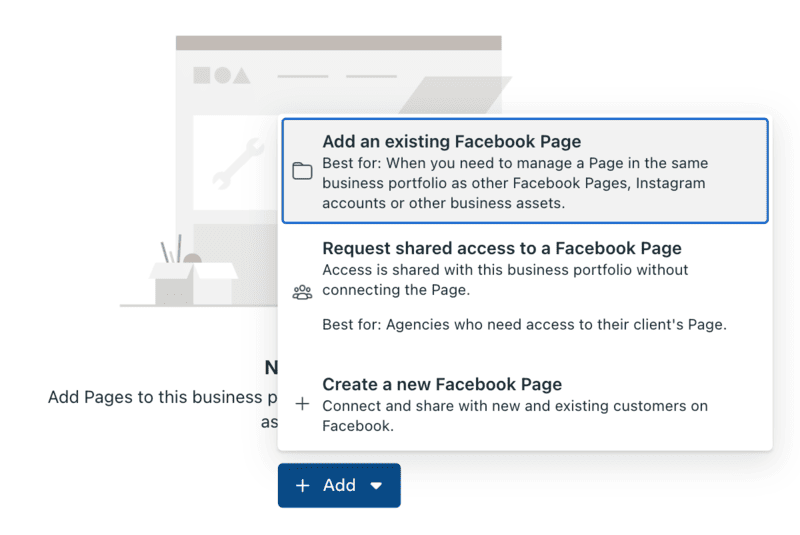
Tap the ‘+Add’ dropdown menu and then select ‘Add an existing Facebook Page’ to link your Facebook Page. If you’re an agency, you must request access to your client’s Page. Select the third option if you need to create a new Facebook Business Page. Click ‘Next’ afterward and follow the steps from there.
Connect your Instagram account to the Business Portfolio
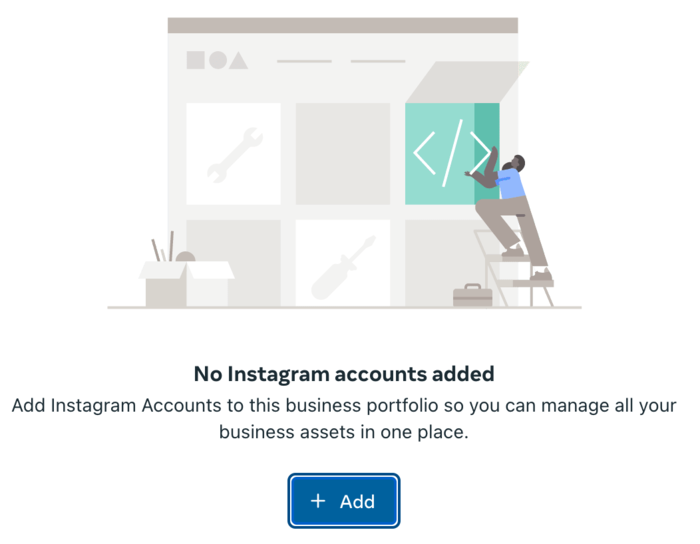
Scroll down to ‘Instagram accounts’ in the same left-side panel menu.
Click ‘+Add’ and enter your Instagram login credentials. After logging in, the Instagram account will move to your Business Portfolio.
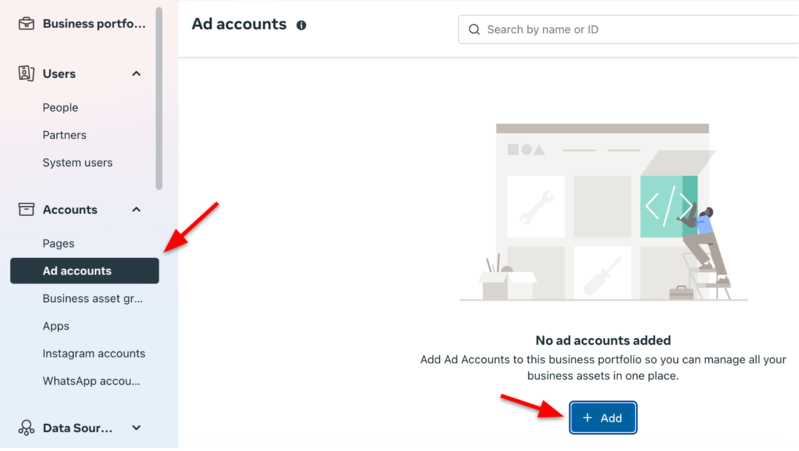
Now that you’ve connected your Facebook Page and Instagram account to your Business Portfolio, it's time to create your Meta ad account. Here's a step-by-step guide:
In the Business Portfolio, go to ‘Ad accounts’ under the ‘Accounts’ section. Tap ‘+Add’ to add a new ad account.
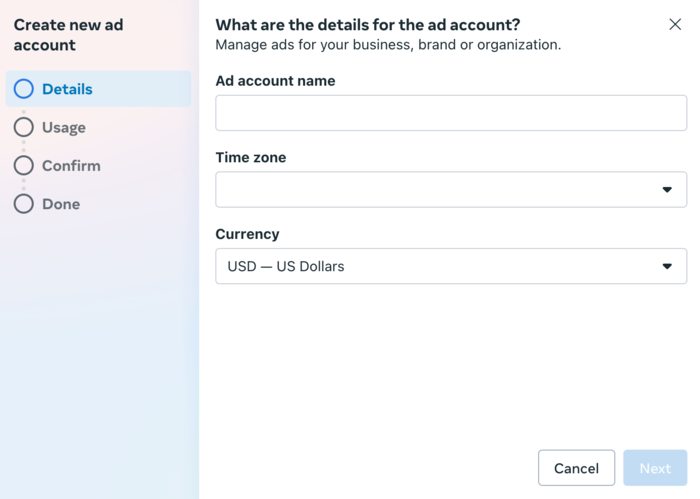
Select the ‘Create a new ad account’ option.
Assign a name to your ad account, select the appropriate time zone, and choose your preferred currency. Be sure to select the correct time zone and currency. These settings cannot be changed later without closing the account and starting a new one. Tap ‘Next’ when done.
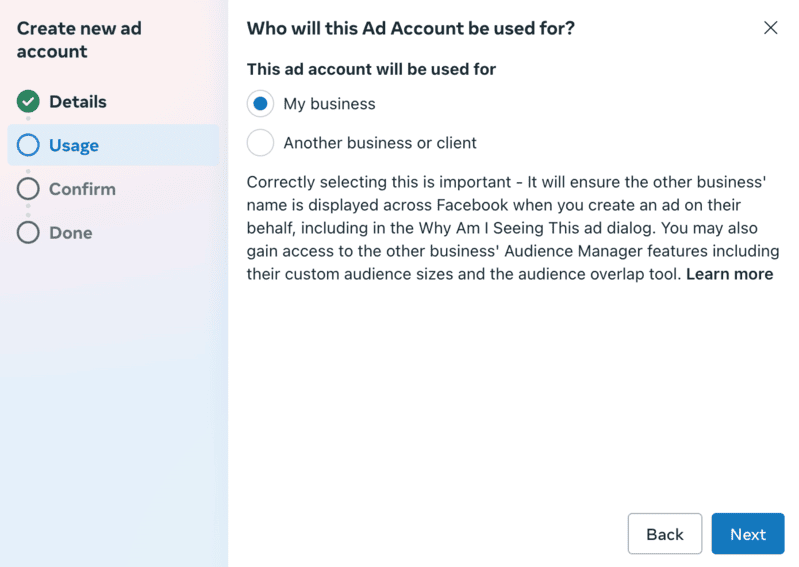
Indicate who you are using this ad account for, be it your business, another business, or a client. Then, click ‘Next.’
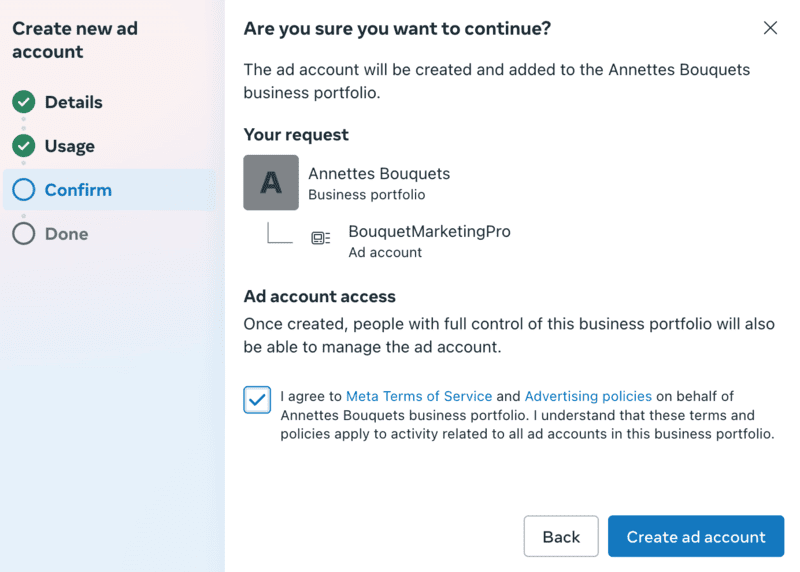
Accept the terms and conditions, then click ‘Create ad account.’
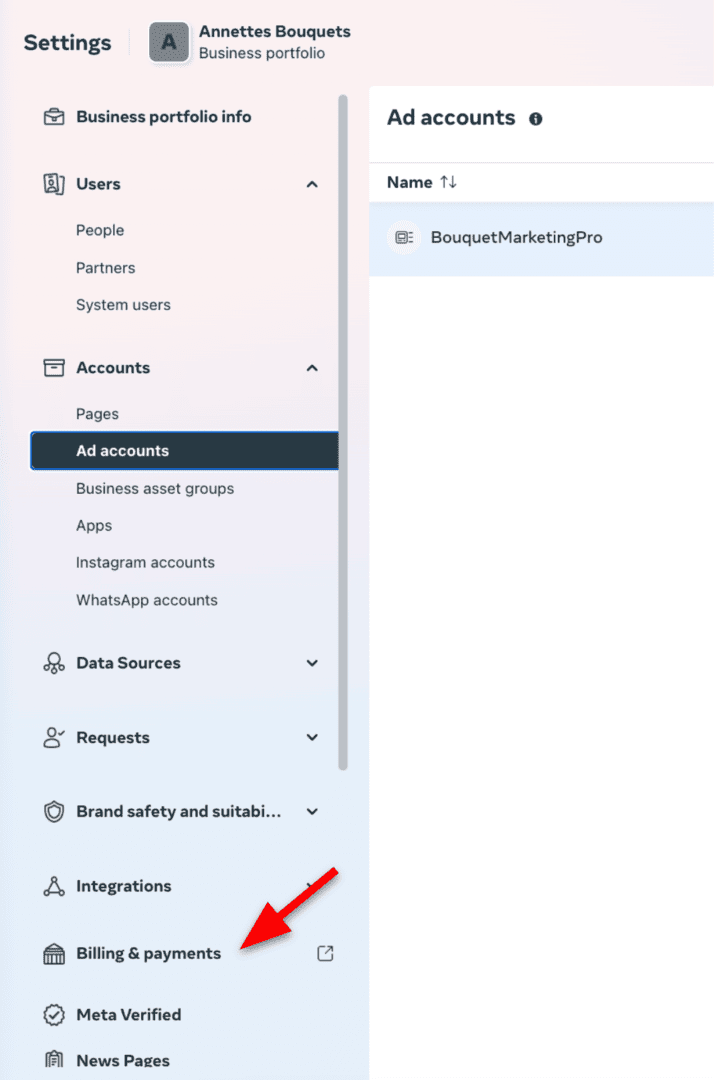
You'll need to set up payment information before you can run ads. Go to ‘Billing & payments’ on the left-hand side panel.
Click ‘Add payment method’ and follow the steps to add your credit card and other payment details.
Are we done? Is my Meta ad account ready?
Not entirely 😅
There are a few more crucial steps to ensure your Meta ad account is appropriately set up and ready for successful advertising:
Set up Meta Pixel and Conversions API
The Meta Pixel and Conversions API are essential for tracking actions people take on your website after seeing your ads:
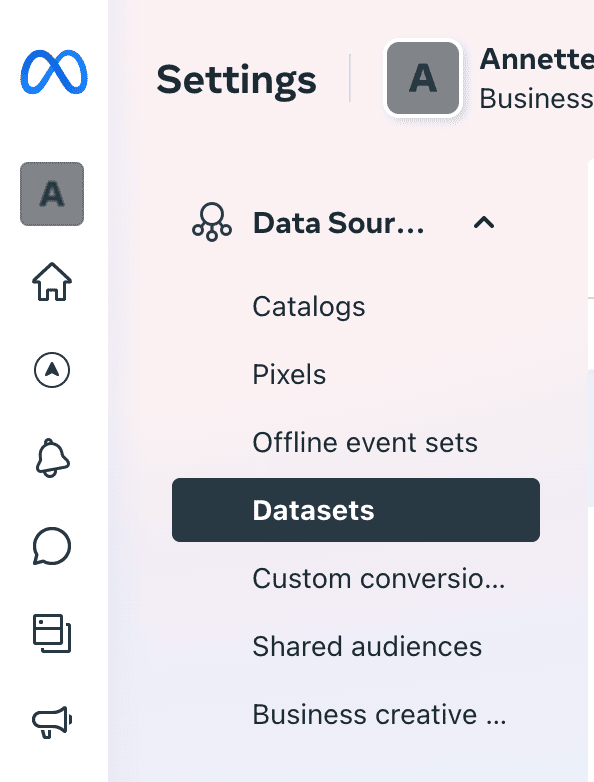
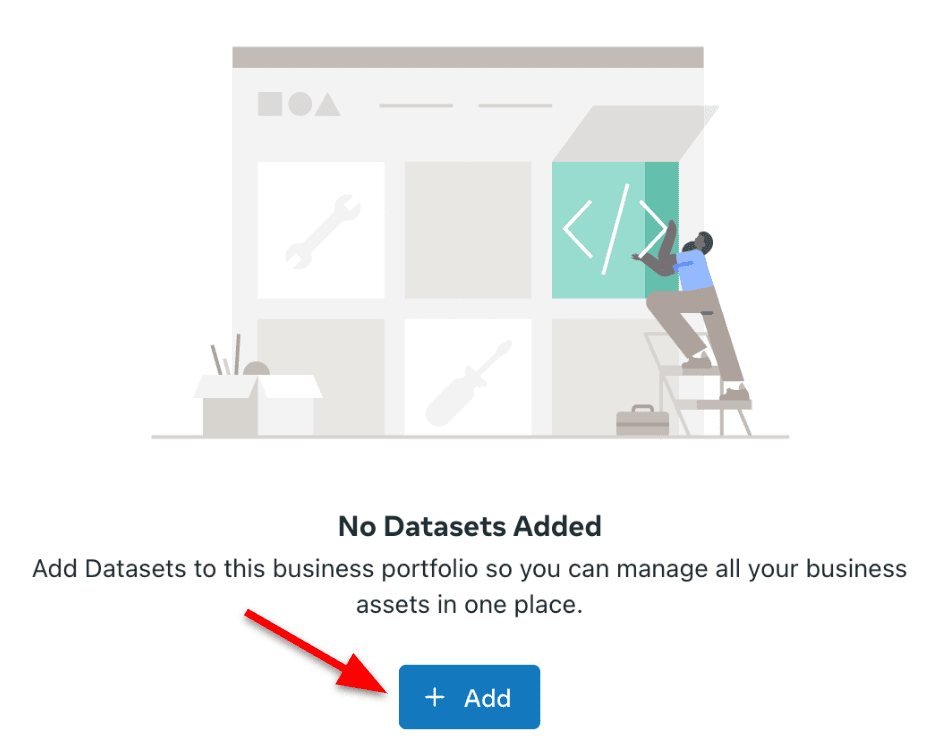
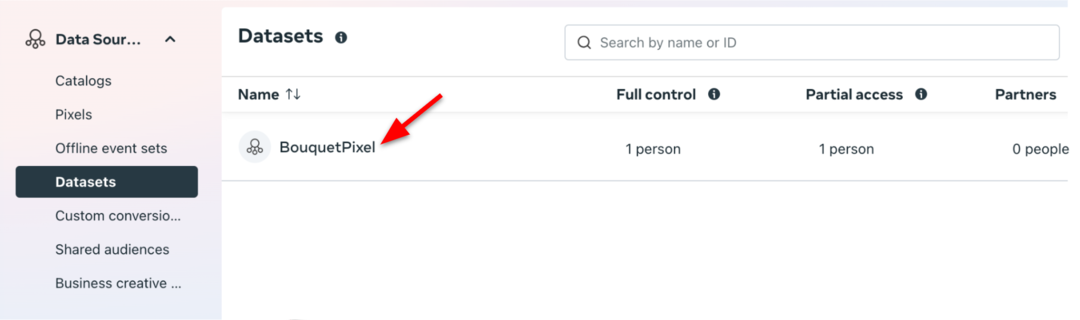
In Business Portfolio, go to ‘Data Sources’ > ‘Datasets’ in the left-hand menu.
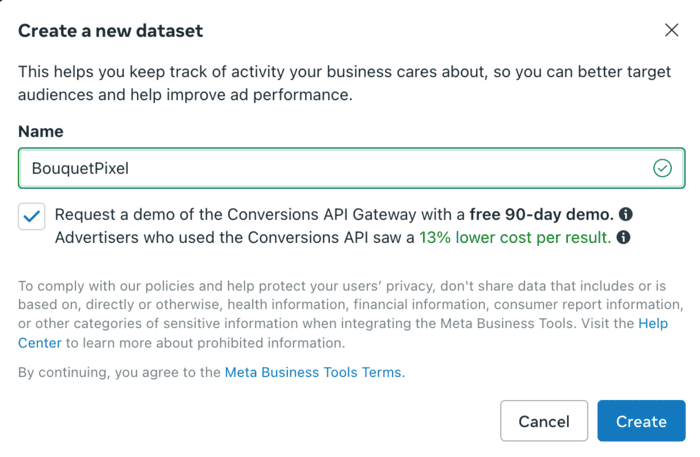
Once you’ve clicked either tab, tap ‘+Add’ to create a new Pixel.
Name your Pixel (typically your business name). Click ‘Create’ to proceed.
You should now be looking at the new Pixel in your Business Portfolio. Click on the Pixel name.
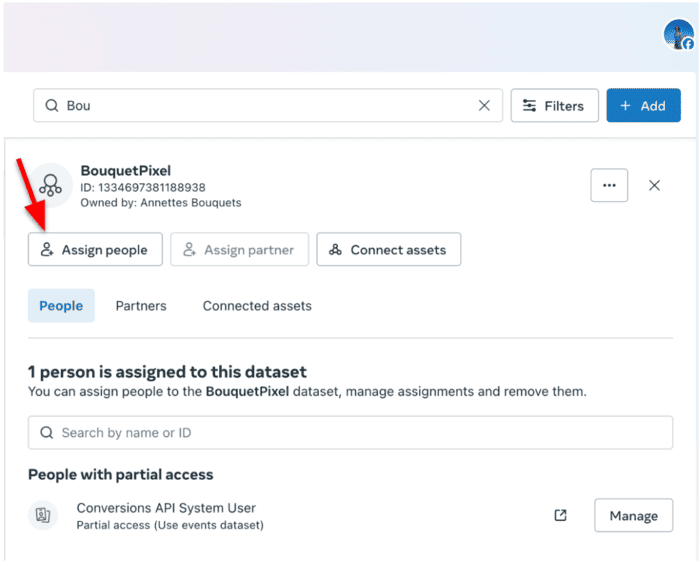
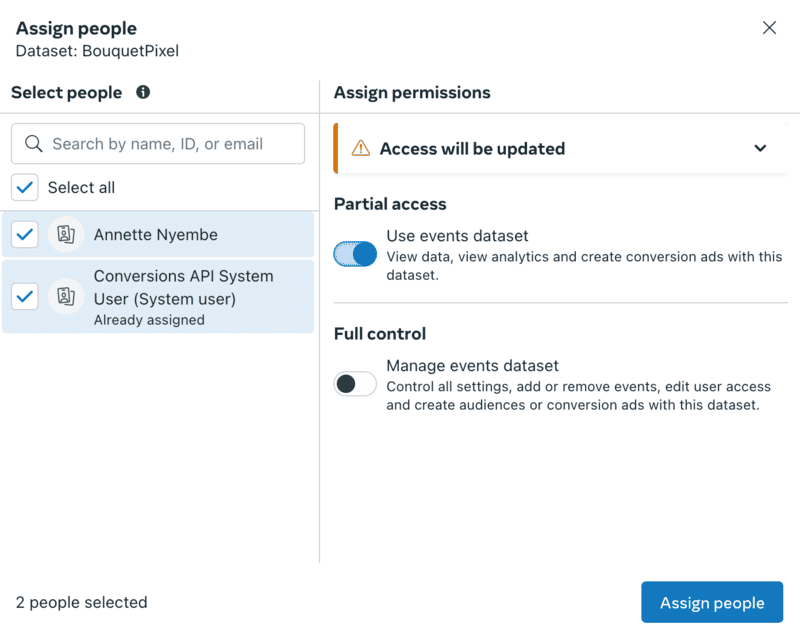
The next step is assigning people and connecting assets. To assign people, tap on ‘Assign people.’
In the left-hand column, check the box next to the person who will manage the Pixel. The Conversions API System User is already pre-configured and linked to your account by default to enable server-side tracking functionality. To confirm its role for the Pixel, check the box next to it. On the right-hand side, adjust access levels by selecting ‘Partial access’ or ‘Full control,’ as required. Once everything is set, click ‘Assign people’ to save your changes.
🛎️ While we’re on the topic of setting up the Meta Pixel, it’s important to note that installing the Pixel on your website is crucial for tracking user actions like purchases, form submissions, and page views. This data empowers you to optimize ad campaigns and measure ROAS. For detailed instructions, check out our comprehensive guide. We also have a guide for setting up the Facebook Conversions API, which enhances server-side data tracking for even more accurate reporting and ad optimization.
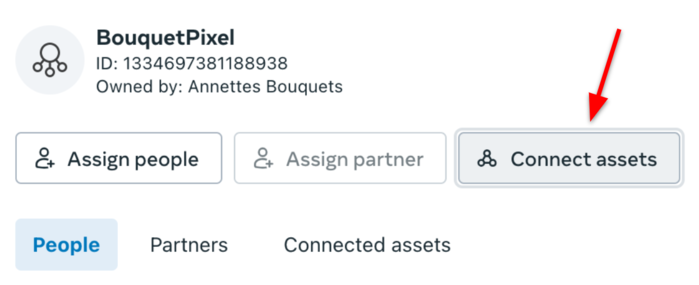
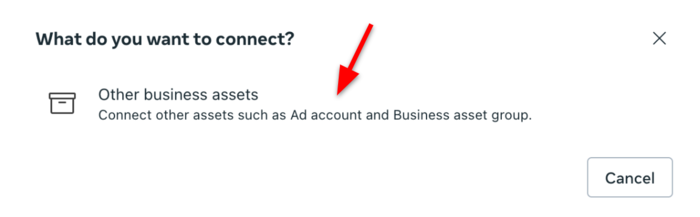
Next, we connect business assets by tapping on ‘Connect assets.’
Click on ‘Other business assets.’
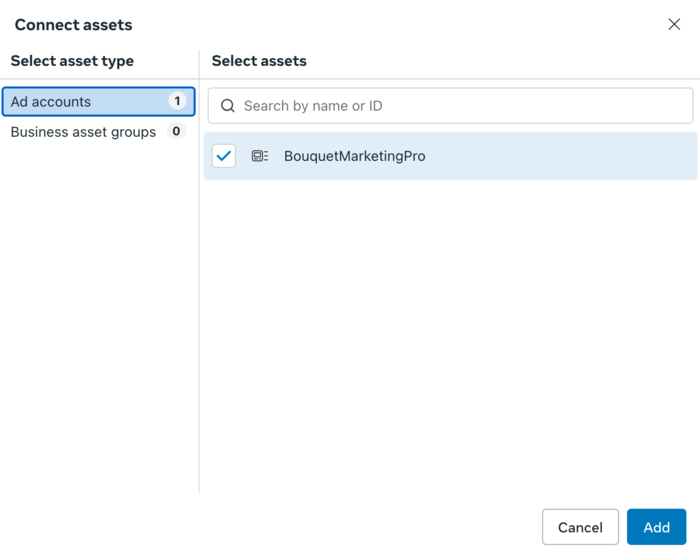
Check the box next to the ad account you want added to the Dataset. Tap ‘Add’ afterward.
Note ☝️ The “Business asset groups” option may also appear on this screen. While not required, creating a business asset group can help organize and manage assets like ad accounts, Pages, and Pixels more efficiently, especially if you’re managing multiple campaigns or teams.
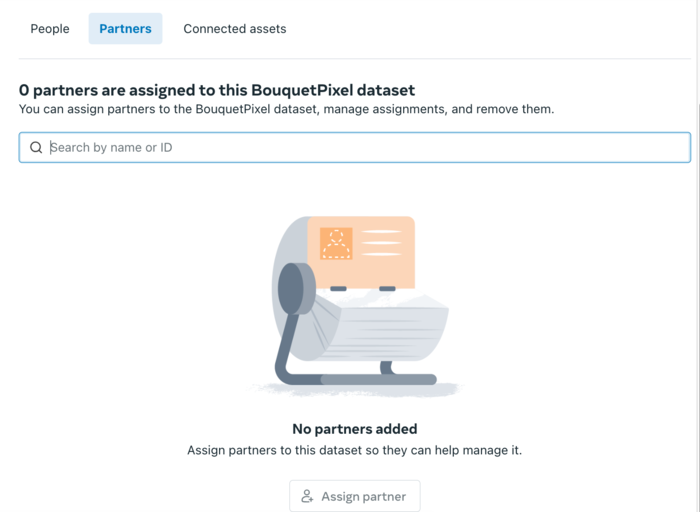
Next, if you're working with an agency or marketing partner, you must grant them access. Ensure your partner has a Business Portfolio of their own. Ask them to create one in Facebook Business Manager if they haven't done so. Obtain your partner’s business ID and use the search bar in the ‘Assign Partner’ section to locate their Business Portfolio and grant them access. From there, select the assets they need access to and their permission level (full control or partial access). Tap ‘Assign partner’ afterward.
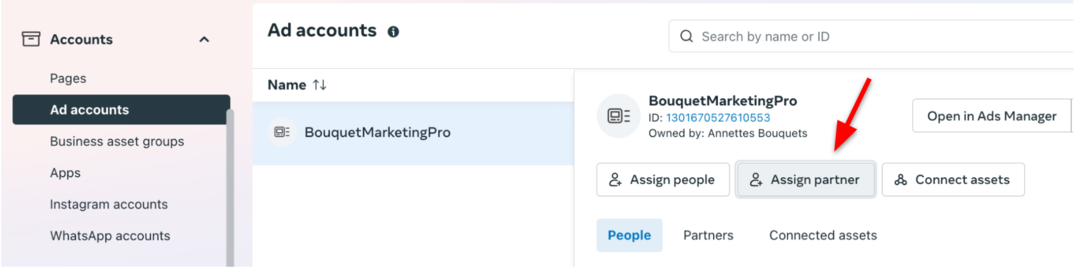
Now, you must grant your partner ad account access. Under ‘Ad Accounts,’ you will find an ‘Assign partner’ tab. Click on it and enter their Business ID. Then, choose the appropriate permissions as you did in the previous steps.
Assign roles and permissions
While it’s tempting to give everyone full control, Meta suggests keeping this limited to protect your account.
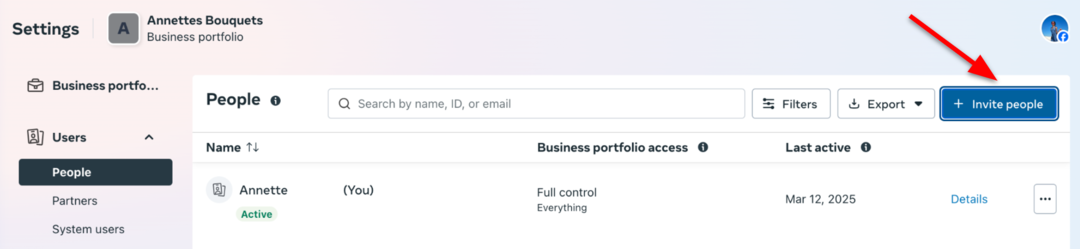
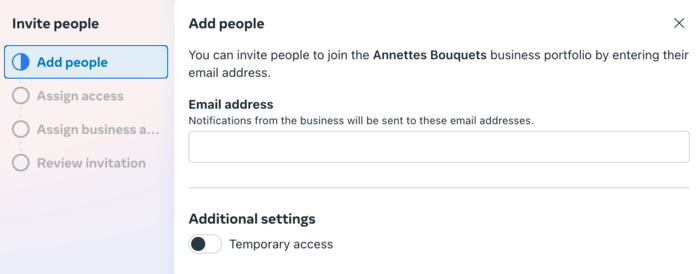
To assign roles and grant portfolio access, go to the left-side panel and select ‘People.’ Then, click ‘Invite people.’
Enter the person’s email address and assign the appropriate permissions based on the necessary access level. You can also grant the person temporary access and specify the duration.
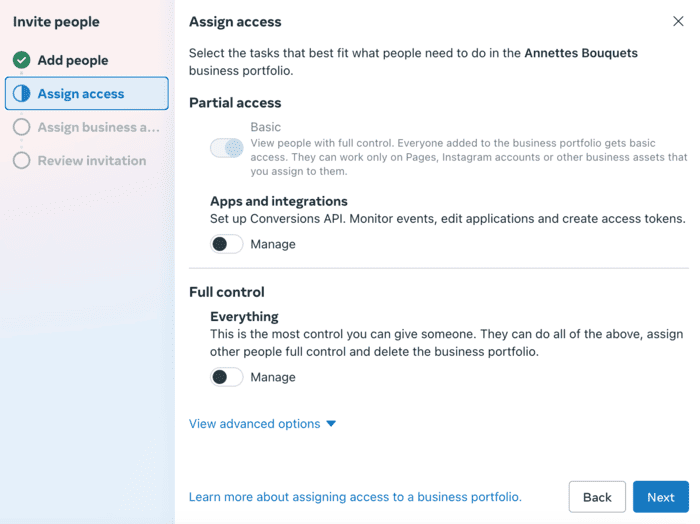
Now, indicate how much control your added people should have. Meta recommends you limit the number of people who can control your Business Portfolio. The limitation is to help keep it secure. When done, tap ‘Next.’
It’s time to assign the business assets. You can assign people to your new portfolio's Facebook Page, Instagram account, and other business assets. Click ‘Confirm selection’ afterward.
To send the invite, simply tap ‘Send invitation’ just below that 📨
Click the drop-down menu next to your ad account name. You will see your account ID. Additionally, you can find your ad account ID in the URL—it’s the long number that comes after "act="
You may need your ad account ID when working with marketing partners, connecting to third-party tools, or troubleshooting issues with Meta support.
Conclusion
Setting up a Meta ad account might seem complex, but it's one of the essential platforms for successful social media advertising. Following the guidance in this article gives you a solid foundation to start building campaigns, but the hard work doesn’t stop there.
With your ad account set up, the next step is to create campaigns that hit a bullseye with your audience and maximize conversions. That is where tools like Madgicx can make a significant difference, helping you create stunning campaigns, optimize them, and reduce costs with AI-powered tools — all while saving valuable time.
Madgicx’s AI Ad Generator uses the genius of AI to craft high-quality Facebook and Instagram ad options in seconds using just a product photo or your chosen ad reference. With AI-generated variations at your fingertips, you can continuously roll out fresh, high-performing ads—keeping engagement high, preventing ad fatigue, and ensuring steady results.
Then, there’s Madgicx’s AI Marketer, which is like having a tireless AI agent audit your account data 24/7. It doesn’t just crunch numbers—it serves up data-driven optimization recommendations you can act on with a single click. Have ads that are crushing it? It’ll tell you to pump up the budget. Got recent visitors ripe for retargeting? You’ll get a nudge. Then, all it takes is one tap on the “Launch” button, which takes action.
Madgicx is your all-in-one powerhouse for Facebook and Instagram ads. Create high-performing ad variations in seconds with the AI Ad Generator, and keep your campaigns and budgets optimized in real time with the AI Marketer.


.avif)