

Think Your Ad Strategy Still Works in 2023?
Get the most comprehensive guide to building the exact workflow we use to drive kickass ROAS for our customers.


With constant algorithm updates, shifting privacy policies, and ever-savvier audiences, simply boosting organic posts isn’t going to cut it anymore.
Whether you’re a seasoned marketer or a beginner drowning in ad jargon, this Facebook ad optimization checklist is your go-to guide for crafting high-performing campaigns.
From nailing your tracking to fine-tuning your targeting, we’ve got all the tips you need to make your ads scroll-stopping and ROI-boosting.
Whether you’re running your first Facebook ad campaign or fine-tuning a long-running strategy, these 6 pro tips will help you optimize every aspect of your ads for better performance
Note: You will need a Facebook Page and access to an Ads Manager account in order to complete all of the steps below. If you don’t have one yet, you can create a new account through Meta’s Business Manager.
Tracking and attribution are the unglamorous heroes that ensure your Facebook ads data is accurate, reliable, and ready to guide smart decisions. Without proper tracking, you won’t know how many purchases or leads your ads generate—or worse, if you’re losing money without realizing it.
Translation: unoptimized tracking is like tossing your money into a black hole.
Let's break down two key tracking methods that you need in 2025: the Meta Pixel and the Conversions API Gateway.
The Meta Pixel is your starting point for ad tracking. This little snippet of Javascript sits on your website and tracks actions like purchases, page views, and adds to cart.
What you’ll need to get started:
Installing the Pixel is step one for tracking—but thanks to Apple’s iOS 14 update, its effectiveness has taken a hit. Apple now requires apps to ask users for tracking permission, and most people opt out. As a result, iOS users may not show up in your conversion data or retargeting audiences unless they’ve specifically opted in.
The good news? The Pixel isn’t your only option.
Server-to-server tracking via Facebook’s Conversions API Gateway takes tracking to the next level.
Since iOS 14 limits the Pixel’s data flow, Facebook introduced the Conversions API, allowing data to be sent directly from your server to Facebook.
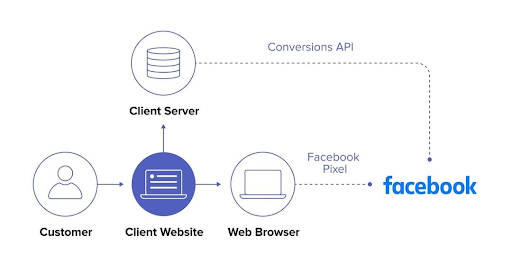
With options like Amazon API Gateway and Google Tag Manager for server-side tracking, you become a first-party data provider, which helps you track more data for your accounts.
Why use the Conversions API Gateway?
Using both tracking methods (Pixel and Conversions API Gateway) ensures a complete picture of your performance so you can make smarter decisions and keep your Facebook ads campaigns profitable.
What you say is important, but how you say it is a close second. This is where your ad formats come into play.
On Meta, there are a few main ad formats available to help you convey your message:
While most advertisers start (and end) with single-image ads, different formats resonate with audiences in unique ways. By experimenting with other formats like carousel or video ads, you can identify what captures your audience’s attention and allocate resources more effectively.
The best way to see which format works is to test it yourself and see which gives you better results. One way to do so is to test them against each other using the A/B tests available inside Facebook and then view the results under the Experiment tab.
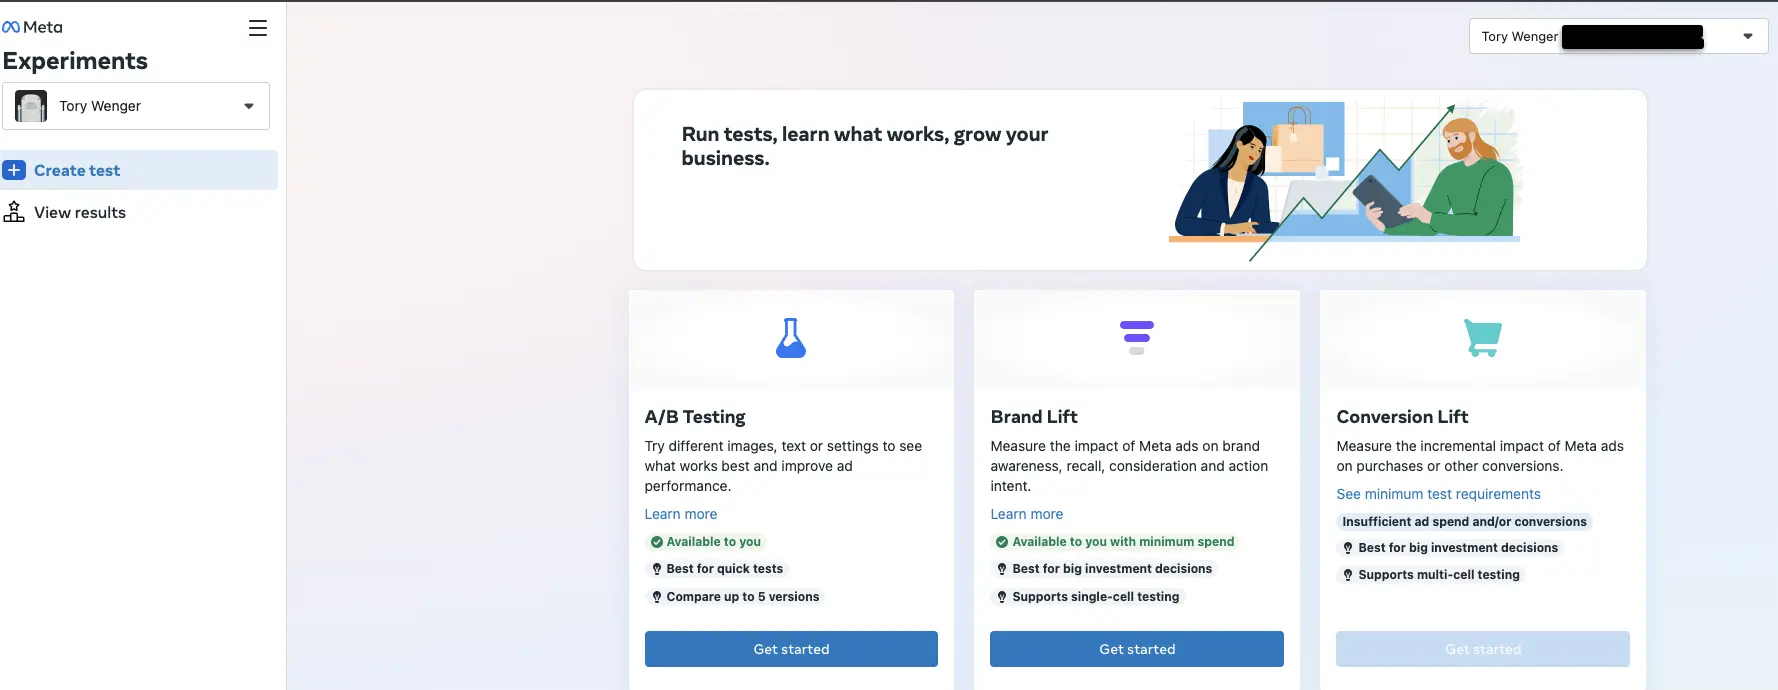
You’ll need to test each ad format across your account, collect the data, and compare results to identify the best performers. Once identified, focus on these top-performing formats in future ad campaigns to optimize your strategy.
Just like with ad formats, your design and messaging help set the tone and leave the right impression on your audience. That’s why it’s a good idea to experiment with different designs to see which ones really click.
While there's a lot that goes into designing a good ad, there are a few mandatory rules you must follow:
You can also use Meta's Advantage+ suite of tools to help personalize your ads for your audience.
If creativity isn’t your strong suit, no worries! Madgicx has you covered with the AI Ad Generator.
Say goodbye to the hassle of manual design and copywriting—simply upload an image, use your own ads, or select from over 2 million real ad examples in the Madgicx Ad Library, and our AI-backed tool generates multiple high-quality ads tailored to your needs instantly. You can also make any edits to your creative in the same window without adding dozens more prompts to get it right.

The best part? You can try both the Ad Library and AI Ad Generator for free ;)
With over 10 million advertisers on Facebook, many of them are competing directly with you to get their ads in front of your audience. This is why you must ensure that your bid (and bid strategy) are prepared to fight the good fight to get your ads seen by your audience.
The Facebook ads auction works a lot like a real-world auction, where multiple bidders compete for the same valuable item. The "item," in this case, is your audience’s attention. The right bid amount and bid strategy are crucial for the success of your campaigns—set it too low or choose the wrong strategy, and your ads may get limited delivery or no impressions at all. Set it correctly, and you can see lower CPM and ad costs all around.
Facebook offers three main bidding strategies: spend-based, goal-based, and manual bidding, each tailored to a specific ad campaign objective:
If you're having trouble winning your ad auctions, don’t worry—there are a few ways to tweak and improve!
If things still aren’t clicking, try testing different bid strategies and amounts to see what works best for your goals.
Even though social media advertising is one of the best ways to sell your products, it isn't a “set it and forget it” game. To keep your Facebook ad campaigns performing at their best and control your ad costs, you need to regularly check which ads are driving the best results and which ones are falling flat—and do something about them.
Luckily, Facebook has a few tools that can help us do just that—Advantage campaign budget and ad set budget optimization.
Advantage campaign budget (formerly campaign budget optimization) allows you to set the budget at the campaign level, letting Facebook’s algorithm automatically allocate funds to the ad sets that perform best.
With ad set budget optimization, you decide the budgets for the ad sets yourself and manage them manually as well.
Just like all tools, there's a time and a place to use each of these methods. And to help you out, we've created a breakdown of best practices for when to use them!

Ultimately, testing both strategies is the only way to know which one aligns with your campaign objective, but typically, advertisers use a combination of both to get the job done right.
It’s tempting to jump straight into running direct purchase campaigns—after all, who doesn’t want instant sales from their Facebook ads?
But the reality is that most people won’t buy immediately from a brand they’ve never heard of. That’s why you need a series of campaigns that guide your audience from strangers to potential and loyal customers.
And it happens that we have a handy example of such a sales funnel, including budget allocation percentages. :)

For those who may not be familiar with these stages, let's take a quick review.
The Acquisition Prospecting stage is all about building brand awareness—finding fresh faces and introducing them to your brand. At this stage, you’ll target cold audiences—people who’ve never interacted with your business before.
Next comes Acquisition Re-Engagement, where you move these new prospects closer to action by driving them to your website. This step relies on engagement-based custom audiences, like those who’ve interacted with your content or ads.
Retargeting is where the magic happens—converting warm prospects into buyers (or leads). Here, you’ll target people who’ve visited your site but haven’t made a purchase yet.
Finally, Retention builds loyalty by turning new customers into repeat buyers. This stage focuses on previous customers with targeted ad campaigns designed to upsell or cross-sell relevant products.
For a truly effective ad strategy, you need Facebook campaigns that target your audience at each funnel stage to keep a steady flow of leads and conversions coming in.
If you want to save yourself the time (and hassle) of creating all these segments, you can try out Madgicx's Audience Launcher, which offers over 100 audience templates to help you find the perfect combination in just a few clicks.
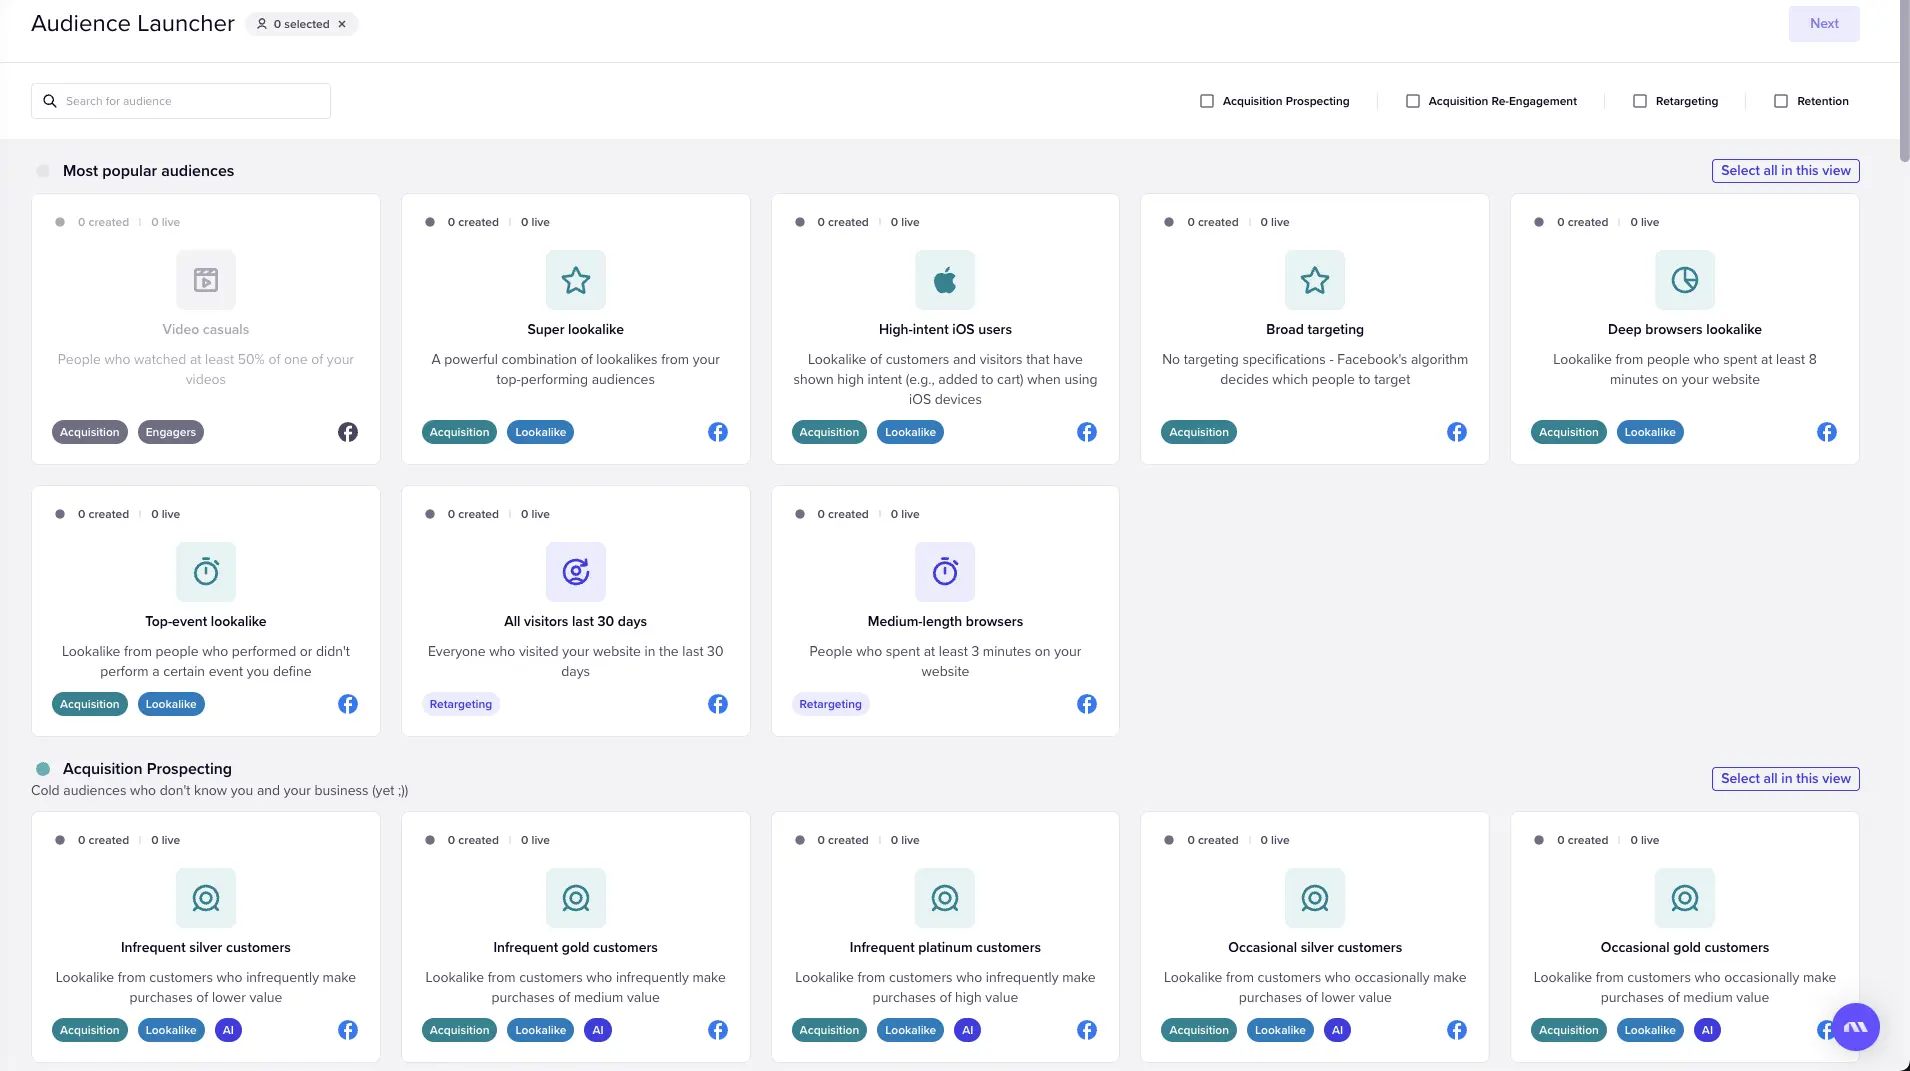
Whether you're building lookalike audiences, custom segments, or interest-based groups, Audience Launcher ensures your Facebook campaigns reach the right people every time. Want to test it for yourself? Try Madgicx free for 7 days.
No guide is complete without a full checklist, and this one is designed to be your quick reference toolkit for Facebook ad optimization. Whenever your campaigns need a refresh, use this list to get back on track and ensure every aspect of your ads is working toward your goals.
Keep this checklist handy and revisit it anytime your campaigns need a boost or you’re launching something new. Optimization is an ongoing process, and these steps will help you stay ahead of the curve!
Budget optimization in Facebook advertising refers to the process of strategically managing and allocating your ad budget to achieve the best possible return. It involves analyzing campaign performance, testing different bidding approaches, and adjusting your budget to ensure every dollar spent contributes to your Facebook advertising goals.
Facebook ad optimization is an ongoing process rather than a one-and-done event. While new campaigns typically enter a learning phase that lasts until you reach 10-50 conversions, optimization doesn’t stop there. Factors like audience behavior, ad fatigue, and changes in market trends mean you’ll need to continuously monitor and tweak your campaigns. Updating creatives, adjusting targeting, and refining budgets are all part of keeping your ads performing at their best.
Let’s face it—running Facebook and Instagram ads in 2025 won't be as simple as it used to be. There is no better time to refine your strategy. With the right tools and approach, you can turn challenges into opportunities. By fine-tuning your tracking, building a full-funnel targeting system, and designing kick-ass ads, you’ll set yourself up for successful ad campaigns that stand the test of time.
Transform your Meta ad strategy with Madgicx, the AI super app designed to optimize your campaigns every step of the way. Create high-performing creatives with the AI Ad Generator, let the AI Marketer handle your ad optimization, and gain actionable insights across your business with analytics you can't get anywhere else.

Tory Wenger is a marketing operations whiz with 10+ years of experience mastering CRM optimization, digital marketing, and event strategy. A certified HubSpot, Facebook, and Google expert, her work has been spotlighted on top platforms like Hootsuite, AdEspresso, and Databox. When she’s not crafting winning strategies, you’ll find her gardening or painting in her home in the Florida panhandle.


