

Think Your Ad Strategy Still Works in 2023?
Get the most comprehensive guide to building the exact workflow we use to drive kickass ROAS for our customers.


Hey there, Shopify store owners! Are you ready to get a turbo boost for your Facebook ads and increase those sales figures?
If you just shouted "Heck yeah!" at your screen, you're in the right place. We're about to embark on a journey and learn how to install the Facebook Pixel on your Shopify store.
[As an official Shopify partner and Facebook ad experts ourselves, we're pretty well versed in both subjects. ;) ]
So, buckle up and keep scrolling—we promise you'll be a Facebook Pixel whizz by the end of this post.
The Facebook Pixel is a small piece of code that you can place on your website (or, in this case, your Shopify store) to track visitor behavior and interactions. It's mainly used to measure the effectiveness of your advertising, understand the actions people take on your website, and reach audiences more accurately.
To implement the Facebook Pixel, you typically need to add it to the header section of your website code or install it via a partner tool (which we'll be covering in a bit).
Once installed, the Pixel code runs in the background, collecting data and sending it back to Facebook, where it's processed and stored for your use in Facebook Ads Manager.
While the Facebook Pixel has had many changes since the release of iOS 14, it remains a valuable tool in the arsenal of every Facebook advertiser.
While setting up the Pixel can be an annoying aspect of Facebook ads, there are several important reasons why it's an absolute must for Shopify store owners.
The Facebook Pixel enhances tracking and ad performance optimization by capturing user interactions on your website following a Facebook ad click. This granular data allows you to evaluate ad effectiveness, informing you which ads drive desired actions and which need adjustment.
After all, it's useless to spend money on ads if you can't actually track how it's impacting your bottom line.
This data is also used when optimizing your ads for conversions, as Facebook will look for users with a high chance of taking that same action based on the data your Pixel is sending over.
By understanding these user behaviors and your overall ad performance, you can refine your ads and targeting strategy, increasing your return on ad spend and making your marketing efforts more efficient and effective.

One of the powerful tools the Pixel provides is the creation of custom audiences.
For example, you can create an audience of people who visited your website in the last 30 days or people who added a product to their cart but have yet to make a purchase. You can then use these audiences for retargeting campaigns by showing specific ads tailored to their previous actions with Dynamic Product Ads.
Furthermore, Facebook Pixel enables you to create lookalike audiences. Let's say you have a custom audience of people who purchased a particular product. You can use this information to create a lookalike audience of Facebook users who share similar characteristics with your purchasers, extending your reach to new potential customers who are likely to be interested in your product based on their similarity to your existing customers.
By building such targeted audiences, you increase the relevance of your ads, improving engagement and conversion rates.
The Facebook Pixel significantly improves conversion tracking for Shopify stores by monitoring and recording actions taken by users on the site after interacting with a Facebook ad.
For example, you might run an ad for a particular product. When a user clicks on this ad, the Facebook Pixel tracks their subsequent activity on your Shopify site. If they add that product to their cart, this is recorded as an Add to Cart event. If they go on to purchase the product, this is tracked as a Purchase event.
The Pixel can also track the value of these conversions. If the user makes a purchase, the Pixel can record the value of that purchase. This allows you to see not just how many conversions your ads are generating but also how much revenue those conversions are bringing in.
This detailed conversion tracking data lets you see which ads lead to valuable actions and calculate your return on ad spend (ROAS). By understanding which ads and user behaviors lead to conversions, you can refine your advertising strategy to boost overall conversions and revenue.
The Facebook Pixel helps you understand customer behavior by tracking how users interact with your Shopify store after viewing or clicking on a Facebook ad.
For example, the Pixel can track 'View Content' events, which occur when a user views a particular product or page on your site. If you notice a lot of users are viewing a specific product, but not many are adding it to their cart, this might indicate an issue with the product's pricing or description.
By understanding these behaviors, you can identify potential issues or opportunities on your site and make changes to address them. This can lead to increased conversions and a better user experience.
Now that we've learned more about what the Pixel is and why it's essential, we can set our eyes on the prize—learning how to create and install the Pixel on Shopify.
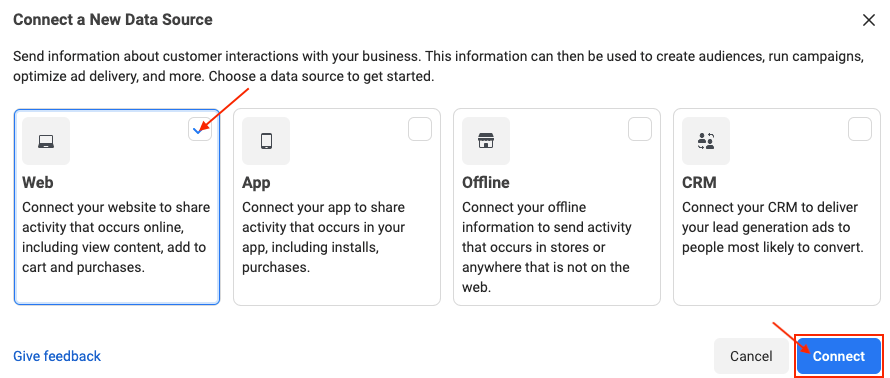
The first step in doing so is to create your Pixel on Facebook. We have a complete guide about setting up your Pixel, but in short, you'll need to:
..and there you have it! Your Pixel has been created, but we're not finished just yet.
The next step is adding our newly created Pixel to Shopify. You can do this from Facebook directly or set it up on Shopify if you prefer.
Since Shopify is a Facebook partner, they have a great integration that will take care of the setup for us. To find it, click 'Check for partner' in the next popup and select Shopify from the list.
From here, it'll ask us to head over to Shopify to finish the setup (but make sure to do this in a new tab).
On Shopify, you'll want to:
After you've done that, you can tab back over to Facebook and toggle the checkbox that indicates you've finished setup.
On the next page, you can verify everything works correctly by submitting your URL to the text box.
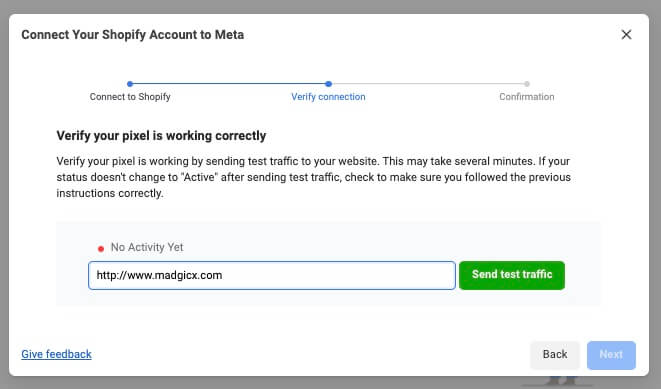
After a few minutes, you’ll see that the red dot above will turn green and show a message that states the activity is being registered. In some cases, it can take up to 24 hours for Facebook to pick up on this data, but you can usually see it within 10 minutes.
Once you've verified your installation, you're all set!
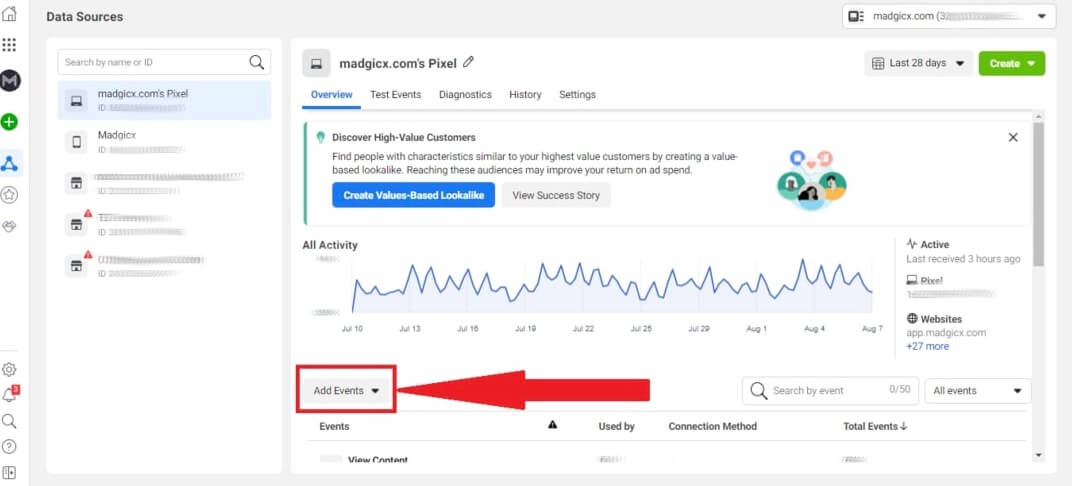
Now that the connection between your Pixel and Shopify has been set up, it's time to talk about events.
Pixel events relate to specific actions that are taken on your site. There are several different types of standard events, but the most important ones for eCommerce are:
You can also create custom conversions if you want to track something that isn't explicitly stated above or something that has a specific value to you.
By default, when you add the Pixel to Shopify, the standard events I listed above are automatically synced with your Shopify account. However, for those that aren't automatically synced, you'll need to set them up manually.
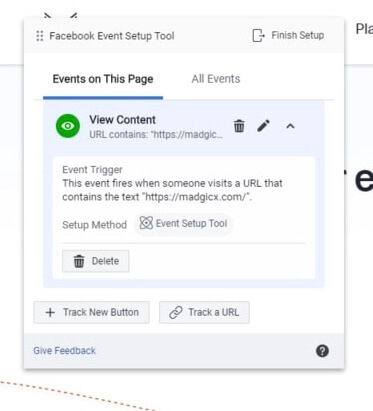
Luckily for us, the Event Setup Tool makes this less complicated than it sounds.


The Facebook Pixel for Shopify is only the essential infrastructure, but since iOS 14 was released in 2021, Shopify store owners can’t rely only on the Pixel.
More and more advertisers now rely on first-party tracking systems that feed accurate conversion data back into the Facebook Pixel, but not everyone has the dev power and knowledge to set them up.
The solution? Madgicx Cloud Tracking!
We'll set up your first-party tracking system with Server-2-Server (S2S) and Enhanced Conversions to achieve maximum tracking outcomes!
In the S2S setup, we tell the existing Meta Pixel to send the data not only to Meta but also to the server we host for you. This allows us to push all the data from the server to Meta in a first-party context (which is not blocked from being tracked and attributed by Apple’s ATT guidelines and other privacy limitations).
Additionally, we set up Enhanced Conversions. This allows you to store user data using first-party cookies as users move through your website, allowing for the maximum number of parameters to get sent with your events.
The setup process only takes 2 days to complete, and you’ll end up with at least 20% more data tracked in your ad account. And the best part is that you can try Madgicx Cloud Tracking for 7 days for free!
As we mentioned above, one of the biggest perks you get from setting up your Pixel is the ability to retarget audiences with razor-sharp clarity.
It seems only fitting that we briefly cover how to do just that!
Not everyone who visits your website for the first time will exit as a customer. That's just reality.
And while we can't change this fact, we can tip the scales in our favor via retargeting.
Retargeting works by using the Pixel we installed earlier to track a user who has visited our site before so that we can serve them another ad to entice them to come back.
As one example, you can do this by creating a website custom audience of users who have visited your website (aka triggered the Page View event) but have not completed the purchase action.
Keep in mind there are around 13 different types of custom audiences and even more retargeting strategies available to you, so feel free to play around with different combinations of tactics to see which one works best for you.
You know when you're browsing an online store, checking out some cool stuff, but then you get distracted and leave without buying anything?
And then, like magic, you start seeing ads on Facebook for the exact things you were just looking at? That's Dynamic Product Ads doing their thing!
Dynamic Product Ads use your Pixel and product catalog to show people the exact products or services they were checking out on your website, in your app, or anywhere else you're selling your stuff.
While setting up Dynamic Product Ads can be a bit more labor-intensive than the Pixel, the benefits are well worth it. In fact, one of America's largest retail chain stores, Target, was able to double their conversion rates by using them.
While retargeting ads can give you great results, it's important to keep a few things in mind to set yourself up for success:
And remember, always keep testing and optimizing your ads based on performance.
As with all things, it's best to hope for the best and prepare for the worst—especially where the Pixel is concerned.
You might run into a situation where you're seeing decreased conversions (or, even worse, none at all) coming from your campaigns. Before you dive into the strategic angle, it's important to check your Pixel setup to make sure that isn't the issue.
(You should also make sure to use other conversion tracking methods to make sure you capture all the data you can.)
Facebook once again has our back with the Facebook Pixel Helper browser extension.
The Facebook Pixel Helper will show you what Pixels are on your site and let you know if there are any issues with the installation.


It's important to note that there's no 'Shopify Pixel.' It's simply the Facebook Pixel. And yes, it's completely free!
There are some apps in the Shopify app store that can do this for you.
If you have taken over an existing store or already installed a Pixel on your store and you want to use a new one, you should first remove any old Pixel from your store to avoid duplication of Meta Pixels and conveyance of incorrect data.
There are 2 main ways to do so.
Removing an old Meta Pixel by editing the theme.liquid file
Removing the old Meta Pixel via Shopify's admin portal
So there you have it, folks! The Facebook Pixel isn't just some fancy code—it's your new best friend in the world of e-commerce. Whether you're just dipping your toes into the Shopify pool or you're already swimming in sales, the Pixel is like your own personal detective, uncovering clues about your customers and helping you turn those almost-sales into actual cha-chings.
And trust us, once you've seen what the Facebook Pixel can do, you'll be wondering how you ever managed without it. So here's to smarter advertising and more sales!
After the iOS 14 update, the Meta Pixel alone can no longer give you all the data you need to make effective scaling decisions. Solution? Get a reliable, accurate tracking system with Madgicx and have it set up for you in just 2 days!

Tory Wenger is a marketing operations whiz with 10+ years of experience mastering CRM optimization, digital marketing, and event strategy. A certified HubSpot, Facebook, and Google expert, her work has been spotlighted on top platforms like Hootsuite, AdEspresso, and Databox. When she’s not crafting winning strategies, you’ll find her gardening or painting in her home in the Florida panhandle.


