How to Delete a Meta (Facebook) Pixel from Website and BM

Date
Jan 18, 2024
Jan 18, 2024
Time
6 min
On this page
How to delete Facebook Pixel

Going round in circles trying to remove your Meta Pixel? Find all the steps to remove it from your website and your Facebook Business Manager.

You want to what??

The Facebook Pixel remains the best mechanism to track your website events so you can create audiences to market to based on this activity. As a result, writing this article seems counterintuitive to me. As a marketer, tampering with your Pixel is akin to playing with fire – I don’t usually recommend it. 

However, certain situations demand it. 

Maybe you've revamped your Pixel, you want to implement Google Tag Manager. Perhaps you’ve switched website platforms? Or, if you’ve decided to bid farewell to Meta ads, this article is your guide. 

Despite my not-so-subtle dissuasion, let's delve into the necessary steps for removal and navigate this process cautiously. And, to the end - no clicking away, please.

Grab your safety helmet, and let’s get started.

How to delete a Meta (Facebook) Pixel from your website

So, depending on how you’ve built your website, there are several ways to remove your Meta Pixel

From Google Tag Manager

  1. Log into Google Tag Manager, go to your ‘Tags’ and select your ‘Facebook Tag.’
  2. Click on the trash icon on the top right to delete the Pixel.
  3. Publish your changes on the Google Tag Manager Workspace.

From your source code

If you’re “old school,” and your Facebook Pixel is installed in your website source code, you can still remove it.

  1. Go to your code editor and navigate to the HTML header section to find the Facebook code.
Start and end of Facebook Pixel code.
  1. Remove the code between these comments and save.
  2. Repeat this process on all pages with the Facebook Pixel code installed.

Removing the WordPress plugin

  1. Log into your WordPress dashboard, and go to ‘Plugins.’
  2. Find the plugin you used to connect the Facebook Pixel and deactivate it or remove it. 

Note:

There are a ton of plugins for this purpose. You must ensure all the plugins for this purpose are deactivated or removed or the Pixel code is removed from the relevant field in the plugin settings.

From Squarespace

  1. Log into your Squarespace account and go to ‘Settings.’
  2. Click ‘Advanced’
  3. Select ‘Code injection’
  4. In the ‘Header’ field, find the code between these two HTML tags and delete it.
Meta Pixel code start and end.
  1. Then, on the ‘Order confirmation page,’ find the same code snippet and delete it.
  2. Click ‘Save’ at the top of the page.

Notes: 

  • Be careful when deleting code, and make sure you don’t delete anything outside of the above, as you could break your website. Squarespace doesn’t support custom code added in code injection.
  • If you have injected Facebook code on any other pages, you will need to go into each page header to remove the code as outlined above.
  • Follow the steps in this article to add a new or reinstall an existing Pixel.

From Shopify

There are two ways to remove the Meta Pixel from your Shopify store.

You can remove it from the Meta (Facebook and Instagram) sales channel app

  • From the Shopify admin panel, click ‘Settings,’ and go to ‘Apps and sales channels’
  • Then click ‘Facebook & Instagram’
  • Click ‘Open sales channel’ and then ‘Settings’
  • In the ‘Share data settings’ section, click ‘Change’ to remove your current pixel.
  • Delete it, connect another pixel, or create a new one
  • Alternatively, you can uninstall and reinstall the app

You can remove it from your Shopify theme file

  • From your Shopify admin, go to ‘Online Store,’ then ‘Themes’
  • In the ‘Current theme’ section, click the ‘…’ button and select ‘Edit code.’
  • Click the ‘theme.liquid’ file to open the code editor
  • Delete the Meta pixel code. You can find it between the <head> and </head> tags.
  • Click ‘Save’
  • FYI, you can add a new Pixel to Shopify by following these steps.

How to delete a Facebook Pixel from Business Manager

Firstly, you can’t fully remove it from your Business Manager, but you can put it in a permanent timeout like a naughty child! Here’s how to disconnect it from your Meta Ad account and remove access so that it’s not available to use by anyone. 
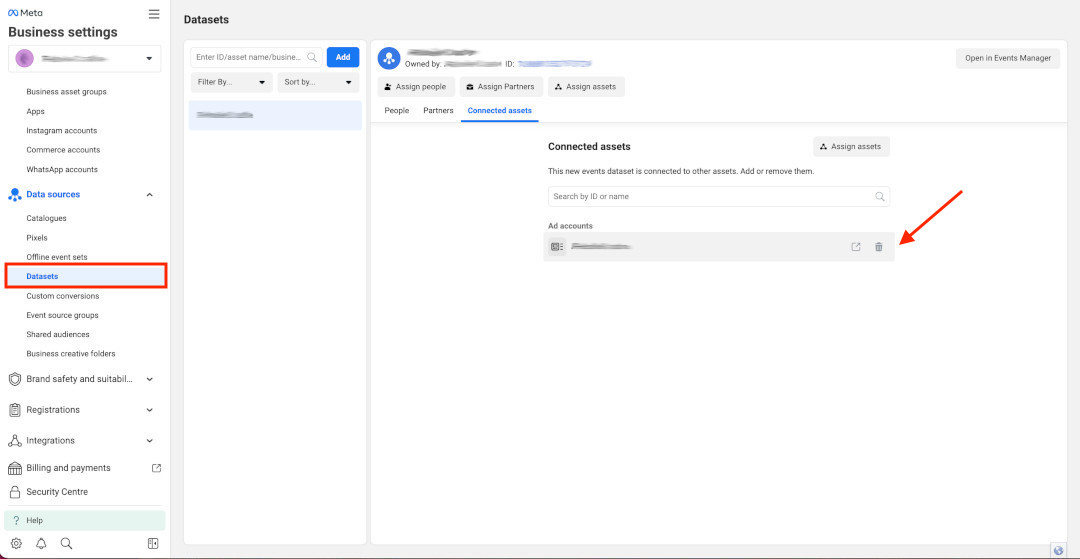
  1. Go to Facebook Business Manager and head to ‘Business settings,’ then ‘Data sources.’
  2. You’ll see ‘Pixels’ on the list, but you must select ‘Datasets’ as Meta is phasing out this submenu. Any Pixels you have can be found under ‘Datasets.’
  3. Select the Pixel you want to remove and switch to the ‘Connected assets’ tab. Here, you can mouse over the Meta Ad Account and click on the trash icon. 
  4. Repeat the process of removing the ‘People’ with access to the Pixel in the same way.
Datasets in Business Settings, in Meta Business Manager.
  1. Open the Pixel in Events Manager, go to ‘Settings,’ scroll down to ‘Connected Partners’ and disconnect them.
  2. Lastly, head to the ’Overview’ tab, click the pencil edit icon, and change the name of your Pixel so you know not to use it again. Something like ‘old’ or ‘dead’ Pixel should suffice. This step ensures that no one will use it by mistake.

Notes: 

  • Once you’ve disconnected it from the Facebook Ad account, it won’t appear as an option during ad creation.
  • Just removing it from the ad account isn’t enough; you must ensure you’ve removed the code from your website as well.

Verify that the Pixel has been successfully removed

With so many ways to install a Pixel on a website, it’s vital to ensure it’s been removed properly before you check off this task. 

In your browser, you can use the Meta Pixel Helper tool to check that your Pixel has been removed and is no longer sending any event data to Facebook. Simply visit your website once you’ve installed the extension.

On Meta, you can check in the Ads Manager and the Events Manager if the Pixel has stopped sending event information. 

Now, your Pixel has stopped sending information AND is undiscoverable to other users in Meta.

Can I recover my Facebook Pixel after it’s been deleted?

Yes, from the Business Manager. You can recover the Pixel from the list in Datasets, reinstall the code on your website, and reconnect it to your other assets. However, Meta only stores 180 days of data. 

To reconnect a Pixel to an ad account, go to ‘Connected apps’ and add it again.

Conclusion

Now you know the steps to remove your Pixel from your website and Business Manager, go forth and make your changes!

Think Your Ad Strategy Still Works in 2023?
Get the most comprehensive guide to building the exact workflow we use to drive kickass ROAS for our customers.
Madgicx Cloud Tracking = Meta Pixel on steroids 💪

Take the upper hand with enhanced data-led targeting with Madgicx Cloud Tracking. Our team of pros set it all up in 1-2 days PLUS, you can try it free for 14 days and watch the data come in.

Date
Jan 18, 2024
Jan 18, 2024
Vanessa John

As a content and technical writer, my goal is to help business owners and advertisers navigate the digital landscape.

Start your 7-day free trial today

Get Started
Get Started
Try 100% free for 7 days. Cancel Anytime
Free training + live chat support
No results? Get a free trial extension