

Think Your Ad Strategy Still Works in 2023?
Get the most comprehensive guide to building the exact workflow we use to drive kickass ROAS for our customers.


If you want to improve your tracking and get it working like the machine it's supposed to, you need to look at using the Facebook Conversions API.
In this article, I’ll delve into what it is, what’s the difference between the Conversion API and the Meta Pixel, how it all works, and what your options are when it comes to setting it up.
Let’s unpack it all and uncloak the mystery.
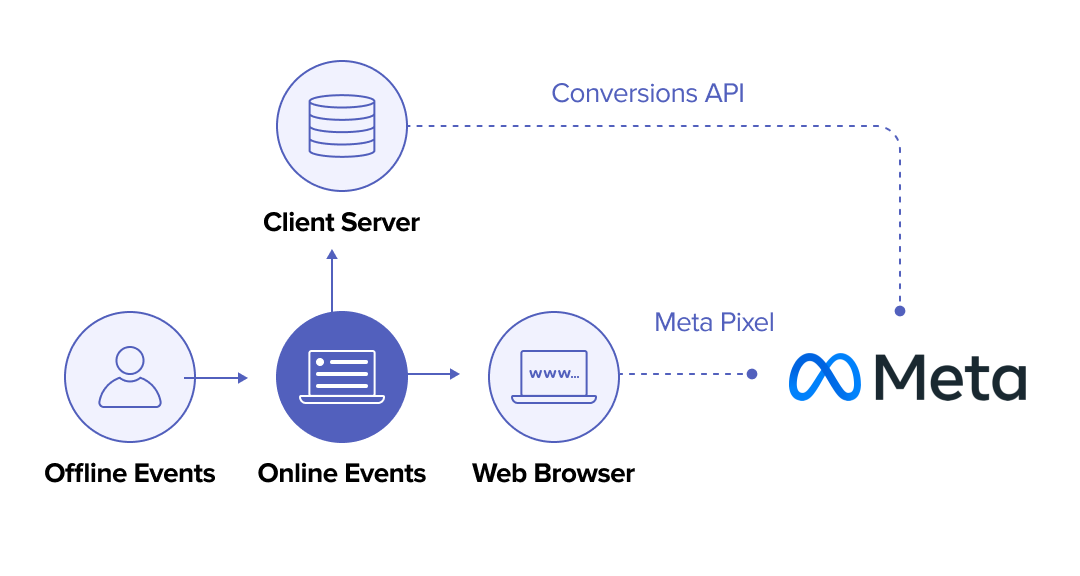
The Facebook Conversions API was designed to create a direct connection between your marketing data and the systems that optimize ad targeting, decrease cost per result, and measure outcomes across Meta technologies.
This server-to-server data connection serves to further enhance the Meta Pixel and your Facebook ad targeting ability, improving results with relevance and ad personalization. This marketing data can include web events, app events, offline conversions, and messaging events.
Before we can explain the difference between the Meta Pixel (previously Facebook Pixel) and the Facebook Conversion API, we should understand the difference between third- and first-party data tracking.
Essentially, these terms refer to how the advertiser got hold of the data.
The Meta Pixel is a must - you cannot advertise effectively on Meta without it - but it’s considered third-party data as it tracks information from the user’s browser when interacting with your website.
Yet, it’s still not enough because users can opt out of this type of tracking.
Since the release of iOS14 and the upcoming disappearance of third-party cookies from Chrome and iOS17, the conversion data that the Conversions API collects is much needed as it closes a huge information gap without using a third party.
As it uses server-side tracking it makes it possible to track the conversion data or events that the Pixel can’t.
These tools work in tandem and the Facebook Conversions API, or Facebook CAPI, is not a replacement for using the Meta Pixel.
You need both to collect your critical marketing data so you know which users to advertise to because they’re most likely to be interested in what you have to offer.
Relevance is everything.
The Facebook CAPI is a powerful tool that can massively increase the efficacy of your marketing campaigns. Here are the reasons you should use it:
Here’s where the Facebook CAPI can add value to your tracking when it comes to web events. It can:
If you use the Conversions API to send app events it will help you be less reliant on SDK and app release updates. Meaning, you can send new event data without the need to maintain the Facebook SDK for iOS or Android or rely on app release updates.
By tracking your offline events in Meta you can paint a fuller picture of the customer journey and the touchpoints involved in your sales. Offline events let you record real-world events outside of what the Pixel can track which leads to even more accurate data.
When using the Conversions API to send offline events, it can help you to
You should use offline conversions to
Sending messaging events via the Conversions API can help you:
We highly recommend using the Meta Pixel as well as the Conversions API to maximize the tracking and effectiveness of your website events. They’re not interchangeable and work in different ways that dovetail to provide reliable data and improve your web events and conversions.
The website events sent through the Conversions API are linked to your Facebook Pixel and behave like events sent through the Pixel too. For example:
Setting up the Meta Conversions API isn’t a straightforward task. As a result, there are a few options available to you.
This may be the easiest way to do this, but it isn’t real first-party tracking. You’re still using a third party to do it for you which doesn’t comply with the privacy regulations since iOS14.
Here are some of the available integrations:
To set up the Facebook Conversions API this way, you must:


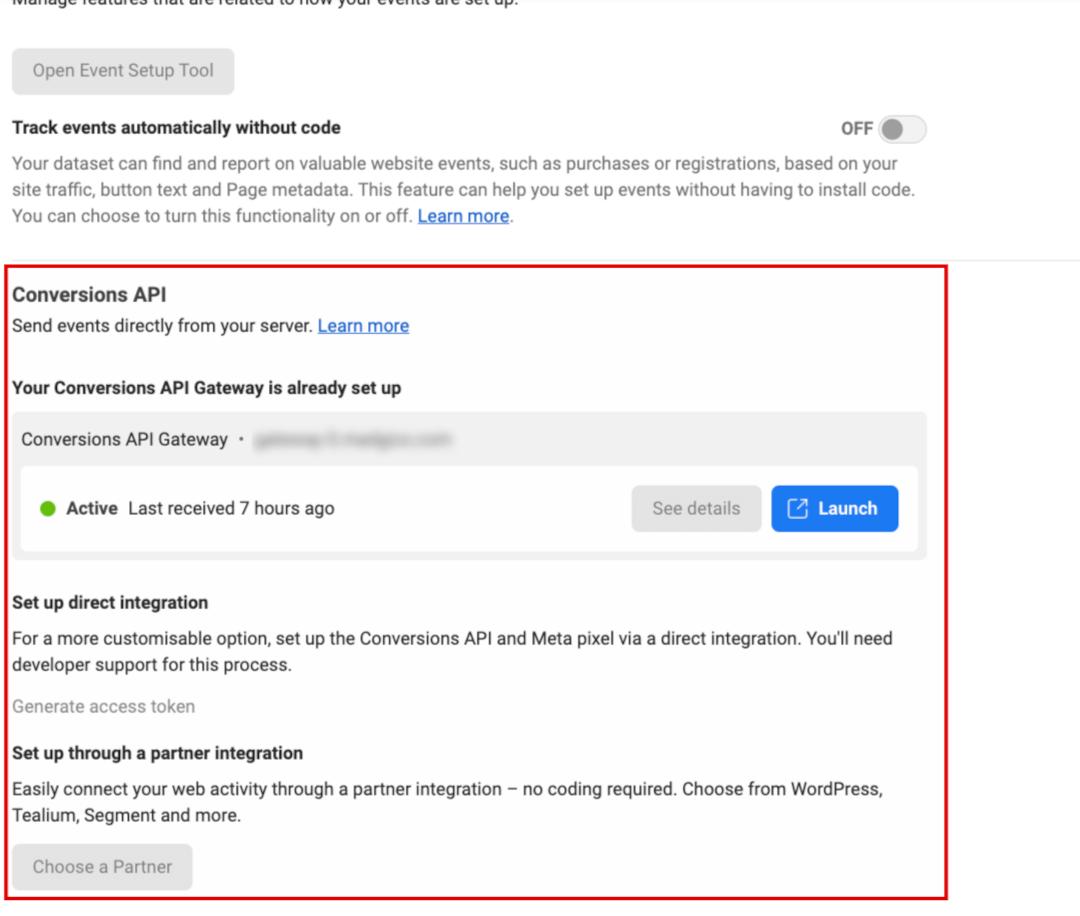


This is the ideal solution but the most expensive one. You can certainly implement the Conversions API code manually to track server events but because it’s so technical it requires a developer, or dev team, which costs a lot of money.
Manually implementing the Facebook CAPI is often done by large businesses who understand that the benefit of this additional and reliable marketing data will eventually outweigh the development costs.
But, we’re not all in the position to make this move.
Using Madgicx Cloud Tracking is the best way to do this because we do all the heavy lifting for you - don’t have to lift a finger. Our team will set it up for you in only 2 days and it requires no dev power from your end.
Madgicx Cloud Tracking is not only our expertise, but it’s much cheaper than hiring a developer. Plus it’s a no-brainer to get one of our Madgicxians to set it up for you. Madgicx offers a solution that yields huge benefits:
Try it for free and see for yourself.
Whichever way you look at it, if you plan to advertise on Facebook, you will need the Meta CAPI in place to succeed. The fastest and most cost-effective way to set up the Conversions API on Facebook is by using Madgicx Cloud Tracking.
It’s the only way to see the real figures - the true ROI of your hard work. One of our Madgicxians will set it up for you in 2 days, and you can try it for free for 7 days before deciding to buy.
Try Madgicx Cloud Tracking to experience the benefits of the Conversions API for reliable marketing data. The best part is our team will set it up for you - no fancy tech skills needed. Try it free for 7 days.
.png)
I use my agency experience in digital marketing and paid advertising to help business owners and advertisers navigate the tech landscape with my content.


