

Think Your Ad Strategy Still Works in 2023?
Get the most comprehensive guide to building the exact workflow we use to drive kickass ROAS for our customers.


Feeling out of the loop with your audience? The missing link might just be a Facebook Pixel on your WordPress site. Without the right tools, it's easy to feel disconnected and in the dark about your website's performance.
By integrating a Facebook Pixel, you gain first-class access to valuable insights that can be leveraged to maximize your revenue potential.
It’s not as complicated as it sounds! It’s a piece of code that you put on your website. Once it’s there, it starts collecting useful information about how people interact with your site. Think of it as a bridge that connects your website to Meta’s advertising services.

Why is this helpful? Well, with the data the Pixel collects, you can understand your audience better. You can see what pages they visit, what products they’re interested in, and even whether they make a purchase. This information can help you create more effective ads, reach the right people, and grow your business.
To begin, you'll first need to create your Facebook Pixel using Facebook's interface. It's important to note that each Facebook ad account can only have one Pixel. Therefore, you'll be using the same Pixel across all your sites.
We've dedicated a more in-depth article to the Meta Pixel and how to set it up on your site. You can check it out here.
To create your Pixel, go to the Meta Events Manager, click ‘Connect Data Sources’ on the left side menu, and follow the instructions.

Once you’ve created your Facebook Pixel, head to the Pixel tab and click ‘Continue Pixel Setup.’
From the options, select ‘Install code manually.’
Then, copy the entire code under ‘Install base code.’
You're ready to insert the tracking code right above the closing </head> tag on your WordPress site. You have a couple of options for doing this:
If you opt for the child theme method, locate your header.php file and insert the Facebook Pixel script just before the </head> tag.
Alternatively, if you prefer to utilize the Insert Headers and Footers plugin (which simplifies the process of adding code snippets to your website's header and footer), navigate to Settings > Insert Headers and Footers. Then, paste the code into the designated ‘Scripts in Header’ box.
And that’s it! You just learned how to add Facebook Pixel to WordPress.
I’ll also show you how to test if your new Facebook Pixel is working at the end of this article. But first, let me cover the plugin method, quickly.
Adding a Facebook Pixel to your WordPress site can be easily done using a plugin. These are some of the most popular free plugins you can use for integrating Facebook Pixel in WordPress.
Pixelyoursite is a fantastic tool for managing your Facebook Pixel and GA4 all in one place. This plugin is super handy because it lets you implement the Facebook Conversion API seamlessly. Plus, it supports WooCommerce and Easy Digital Downloads, making it a versatile choice for e-commerce sites.
The fact that pixel your site comes highly recommended by Google’s experts adds credibility. With over 400,000 active installations and a stellar rating of 4.5, it’s a reliable choice for website owners.
Here’s how to install it:
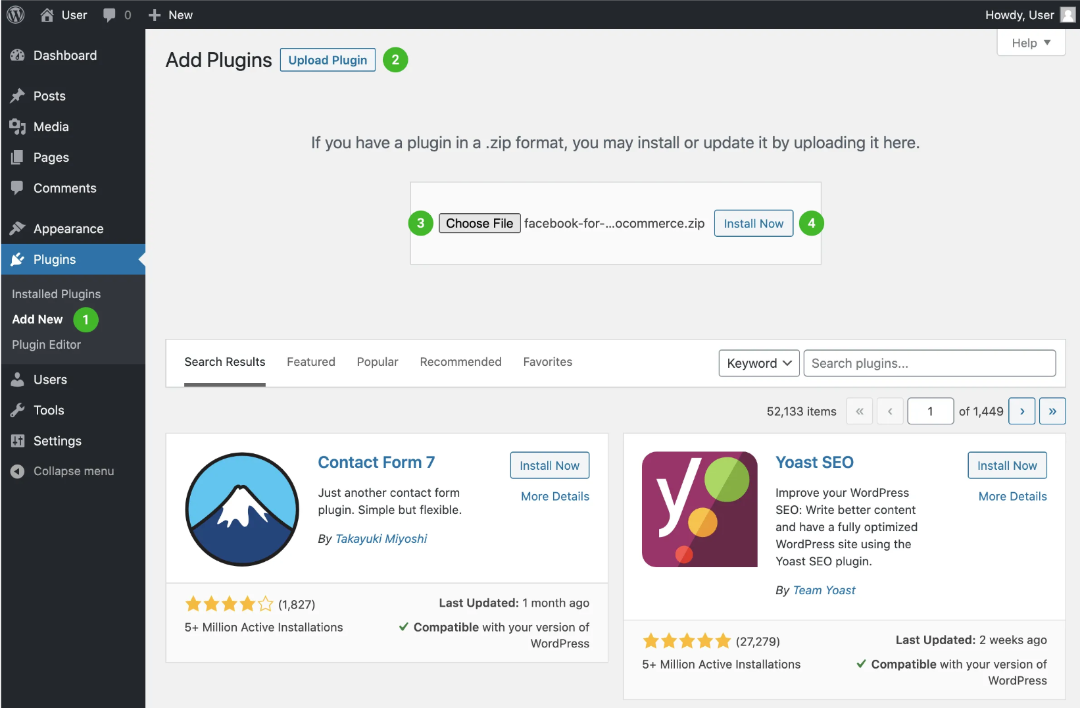
After downloading the Pixelyoursite plugin, head to your site admin and click the Plugins link in the left menu. Click on ‘Add New’ and then on the ‘Upload Plugin’ button.
Select ‘Choose file’ and select the plugin file you downloaded earlier. Then, click ‘Install Now.’
Tap ‘Activate Plugin.’
You’re ready to add the Facebook Pixel to WordPress:
Facebook for WordPress is the official plugin that connects your website to Meta. With this plugin, you can install the Facebook pixel for WordPress, upload your online store catalog, and easily run dynamic ads.
The inclusion of Conversions API support adds another layer of functionality. The Conversions API allows you to send events (such as purchases, sign-ups, or other actions) directly from your website to Facebook, ensuring accurate tracking even when cookies are blocked or unavailable.
The plugin has an impressive user base with over 500,000 active installations. However, it’s essential to note that reviews are mixed, with an average rating of 2.5 stars. Some users may have encountered issues or limitations.
Additionally, the plugin’s code is not Safari compatible, which could impact the user experience for Safari browser users.
Here’s how to install it:


Pixel Cat makes it easy to set up Facebook and Google tracking pixels. Its point-and-click builder simplifies the process of creating Standard Events for tracking conversions and building retargeting audiences.
The interface is beginner-friendly, which can be appealing to users who are new to pixel implementation. You've got the power to tweak event details like price and currency, making sure you track your ad returns with pinpoint accuracy.
Targeting specific visitors based on the pages they've been checking out is also easy. You don't even need to be a coding whiz to use the event builder.
Pixel Cat has a rating that's just shy of a 4-star average (3.9 stars). While its active installations currently hover around 40,000, it’s essential to consider that active installations alone don’t always reflect quality or usefulness. Other plugins with higher installations might have been around longer or have different marketing strategies.
Some users might prefer Pixel Cat due to its simplicity and features.
Here’s how to install it:
Now go to WordPress to add the Facebook Pixel:
The Pixel Manager is a dynamic plugin that excels in seamlessly integrating with essential platforms, catering to both seasoned e-commerce professionals and newcomers alike. By effortlessly connecting your WooCommerce store to Google Analytics, it provides deep insights into performance metrics and user behavior.
Moreover, it simplifies Google Ads conversion tracking, empowering users to monitor campaigns and optimize spend effectively. With seamless integration with Meta platforms, including Facebook and Instagram, custom audience creation, conversion tracking, and retargeting become a breeze.
Additionally, integration with Hotjar enables visualization of user behavior, heatmaps, and session recordings to enhance the overall customer journey. Extending its reach to Microsoft platforms and even TikTok, the Pixel Manager ensures synchronized data and enables conversion tracking on various channels.
It might have only 50,000 active installations but it makes up for it with its impressive 4.9 rating. The Pixel Manager has proven to be a compact yet powerful tool that packs a punch.
To install it:

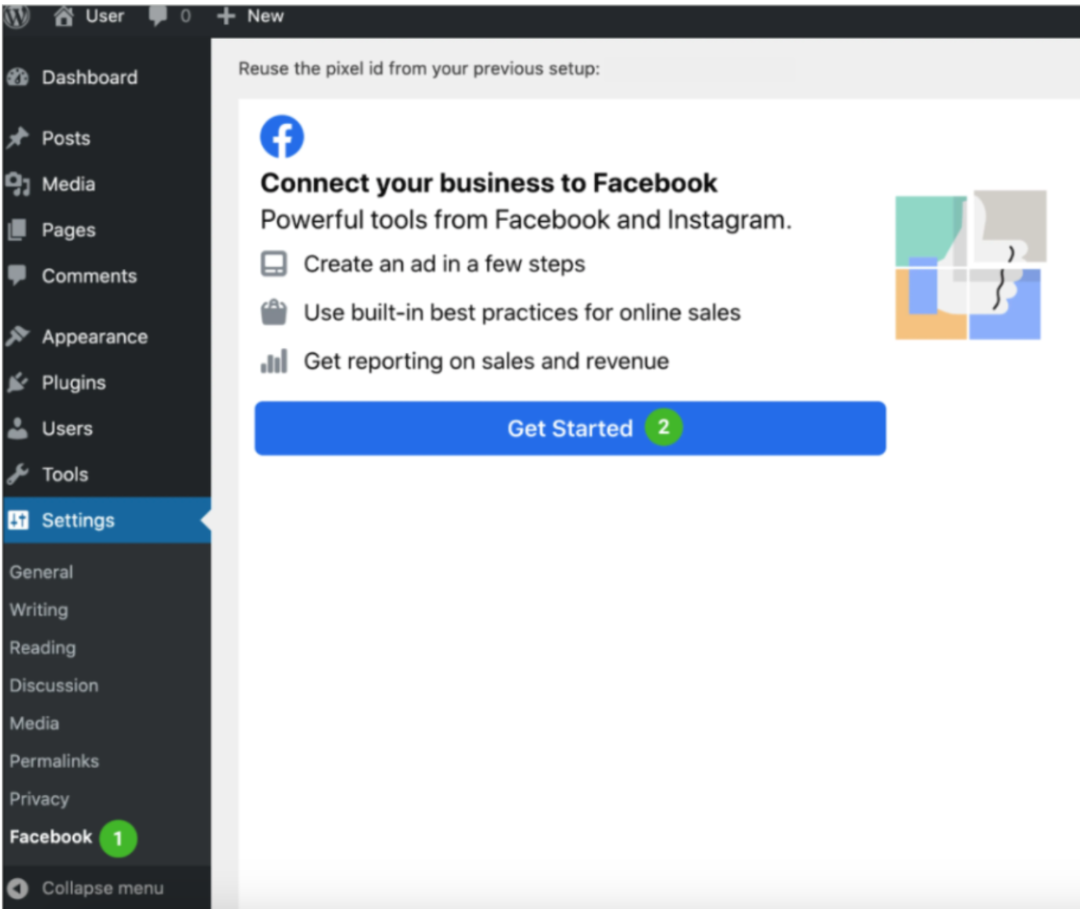
Now we add your Pixel:

While not recommended, there are situations where you might need to delete a Meta Pixel. Perhaps you're looking to implement Google Tag Manager, switch website platforms, or even bid farewell to Meta ads (which we don’t recommend at all!).
For more guidance on this, check out our dedicated article on how to delete your Meta (Facebook) Pixel.
Follow these 3 steps:
Step #1 Go to your Meta Business Suite. In the left-hand menu options, click on ‘All tools.’

Step #2: On the pop-up menu page, click on ‘Events Manager.’ A new page will pop up - this is where all your Pixel events are stored.

Step #3: You should be able to see all your data sources and Pixels. Under the Pixel name is the Facebook Pixel ID number.
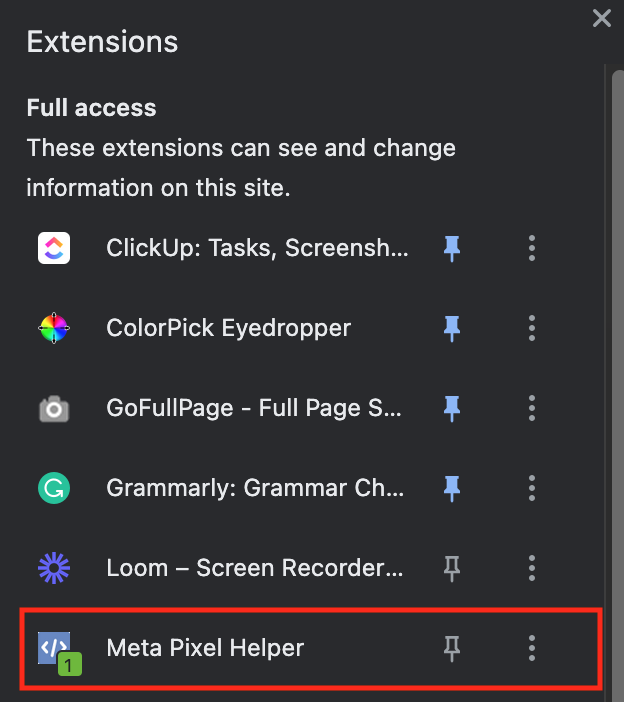
Before jumping into campaigns and worrying that they're not delivering results, it's crucial to verify if your Facebook Pixel is firing correctly. You can either check in the Facebook Events Manager or with the Meta Pixel Helper Chrome extension.
Log in to the Events Manager and select your pixel in the 'Data Sources' tab. Below is the ideal setup scenario. As you can see, all events are active and error-free. For eCommerce sites, having a purchase event set up is crucial for tracking ads effectively.
If you're not seeing the events you've set up, ensure you're logged into the correct Facebook Account/|Pixel and check for any error messages for further insight.
To manually test events, consider the following ways:
Option 1: Facebook Test Events tool
Option 2: Diagnostics tab in Events Manager
The Meta Pixel Helper is a valuable troubleshooting tool that ensures your Meta Pixel is functioning correctly. It scans websites for Meta Pixel code and provides real-time feedback on its implementation. Here’s how you can use it:
What steps should you take if you encounter configuration issues? Check out this article. It’s specifically tailored to troubleshoot Pixel problems using the Meta Pixel Helper.
Now that you’ve successfully added a Facebook Pixel to your WordPress website, the next step is to leverage the full power of this tool to enhance your marketing. Here’s what you can do:
The Facebook Pixel enables you to track specific actions or 'events' on your website, ranging from a user's site visit to a purchase. By monitoring these events, you gain invaluable insights into user behavior, identifying which actions lead to conversions. Armed with this data, you can optimize your ads and leverage the Pixel to improve your marketing campaigns.
Using events, you can also automatically create custom audiences based on the said interactions with your website or app. For example, Retarget users who added items to their cart but didn’t complete the purchase. Or, Target users who visited specific pages or engaged with specific content.
With this valuable data at your disposal, you can also leverage lookalike audiences to find similar individuals who mirror your existing customer base. By identifying and targeting users who exhibit comparable traits, you can expand your reach and connect with a whole new group of potential customers who are likely to be interested in your offerings.
While the Facebook Pixel serves as a crucial foundation, it’s just the starting point. Madgicx Cloud Tracking takes your tracking game up a notch, providing unparalleled accuracy in first-party tracking for your ad performance.
With the looming threat of third-party cookies becoming obsolete, securing the future of your Meta campaigns is non-negotiable. Madgicx Cloud Tracking provides a sturdy first-party data tracking solution, ensuring your Meta ads remain steady, come what may.
With no coding skills required, you're off the hook! 🥵 Our team manages the entire setup process, getting your tracking running in just 2 days. The result? An increase of 20% more data in Ads Manager in just two weeks. Why wait? Start your 7-day risk-free trial of Madgicx Cloud Tracking HERE.
Despite the name change to Meta, the Pixel is still very much alive and kicking. It continues to be a cornerstone tool for businesses and advertisers, helping them understand their audience, measure the effectiveness of their advertising, and improve their marketing strategies.
So, no, the Facebook Pixel is far from being obsolete. It’s still very much a key player in the digital advertising industry.
It certainly does. The Meta Pixel can be integrated with WordPress, one of the most popular website-building platforms. This means you can track visitor activity, optimize ads, and create targeted audiences for future ads on your WordPress site.
So, whether you’re running a personal blog or a business website on WordPress, the Meta Pixel has got you covered!
Still relying solely on the Meta Pixel for scaling decisions? It's time to level up. Fortify your Meta ads tracking effortlessly with Madgicx Cloud Tracking. Get accurate performance data fed straight into your Meta Ads manager—no complex coding needed on your part.
.avif)
Digital copywriter with a passion for sculpting words that resonate in a digital age.


