

Think Your Ad Strategy Still Works in 2023?
Get the most comprehensive guide to building the exact workflow we use to drive kickass ROAS for our customers.


Are you accurately measuring the full impact of your Facebook ad campaigns? Do you have the full picture of the touchpoints involved in closing a sale? By using Facebook offline conversions, you can reveal these external touchpoints and attribute them to the Facebook ads that connected the customer to you.
To avoid losing any conversions on your website, you should leverage Facebook’s offline conversion tracking. This solution gives you the freedom to report events that occur in the real world back to Facebook - outside of what the Pixel can track digitally, giving you more accurate reporting data.
By tracking events like phone calls, in-store sales, in-person events, or registrations, you can paint a fuller picture of how your Facebook ads are performing. Moreover, by doing this, you can also accurately attribute these sales to the digital touchpoints responsible for the sale.
Having these insights is a must-have for everyone who advertises on Meta—no matter what kind of business they have. In this article, we’ll explain how to set up offline conversions as well as how to futureproof your business considering the upcoming Meta updates. But first, let’s recap so we’re on the same page.
The system behind Facebook offline conversions allows you to upload “offline” event data to Facebook and match transactions that occurred in your offline channels with people who saw or clicked on your Facebook ads. If a match is found, Meta will attribute the conversion to your ads.
Your offline events data could come from a variety of sources, including your front desk conversations, your point of sales system, your call center or CRM software, or even digital touchpoints other than your website and social pages, like emails or surveys.
These conversions include in-store purchases, bookings made over the phone, in-person consultations, or any other transactional event like this. And while these conversions take place offline, the customer journey probably began online, with people seeing and clicking on your ads.
Facebook offline conversions can also be used to accomplish the following tasks:
Offline conversions let advertisers track the full customer journey throughout the purchase process. When you have this data, your reports become more accurate, thereby becoming more meaningful. Furthermore, by seeing how many steps in this journey your Facebook ads were responsible for, you can attribute the sale correctly.
By setting up offline conversions for their businesses, advertisers and business owners can enjoy the benefit of regaining access to the 28-day attribution window. The 28-day click and 28-day view windows are no longer supported under Facebook’s new ad set level attribution setting for web conversions.
Additionally, setting up offline conversions along with other tracking tools like Google Analytics and the Facebook Conversions API allows advertisers to capture all of their cross-channel conversions and attribute them to the correct Facebook ads and ad sets.
These various tracking tools give business owners and advertisers access to a broader range of data—making it an excellent solution for eCommerce businesses struggling to merge the impact of the digital and real world together.
This all being said, be prepared for changes. Meta announced it will be removing the Offline Conversions API in the latter part of 2024, which means how you report your offline conversions will change. Watch out for updates on this.
Before you can start tracking your offline conversions on Facebook, you’ll need the following:
Once this has been accomplished, you can start sending interaction data from your eCom and physical stores to Events Manager. Facebook will then match your conversions event set (which contains your offline event data) with your site conversions. It does this to identify the ads that generated conversions on your website and avoid event duplication.
How does Facebook do this? Facebook Click Identifiers (FBCLIDs) are used to track outbound clicks from Facebook ads. In other words, if a Facebook user clicks on an ad and is redirected to your website, a unique FBCLID is generated and appended to the URL.
All of the Facebook user’s unique identifiers are kept in the FBCLID. Once a conversion has been captured, Facebook scans all of your offline event data to see if it can match any of it to the conversion, resulting in improved conversion attribution.
You can either report offline conversions manually to Facebook by uploading a .csv file or automate the process by using the preferred Facebook Conversions API or leveraging existing Facebook partner integrations.
For now, let’s go over manually uploading your offline event data in Events Manager. We’ll discuss other methods later.
1. Go to Events Manager and navigate to the green plus (+) sign on the left-side menu. Click “Connect Data Sources.” That will create a pop-up. Select “Offline” and click “Connect.”

2. Name your offline event set and add a description (optional). Click “Create.”

3. Select the ad accounts for ad performance tracking using this offline event set.
4. You have the option to switch on auto-tracking so that the new ads you create in this ad account will default to this offline event set. You can also switch on auto-assignment so that new ad accounts will automatically be assigned to this event set. Once you’re done, click “Next.”

5. Now that you’ve created an offline event set, you can start adding people to it and managing their permission settings. Make sure that all authorized users have the correct permissions so that they can upload interaction data to your offline event set. For more information, check out Facebook’s guide to managing permissions for offline event sets.

Create a CSV data file with your interaction data. This file should contain as much information as possible to ensure accurate reporting:
You have 90 days from an ad impression to upload your offline event data. However, if you create an offline event set without uploading any data within 90 days, Facebook will reduce your timeline for uploading data to 35 days. If you can upload data within the 35-day window, your timeline will be extended back to 90 days.
Note that Facebook recommends uploading offline event data within 48 hours after event occurrence for optimal reporting. Moreover, offline events should be uploaded sequentially by date (i.e., the order in which they occurred).
In order to upload your CSV data file, observe the following steps:

Alt Text=”screenshot of Events Manager; offline event set selected under Data Sources”

Alt Text=”Uploading offline event CSV data file in Events Manager”

Alt Text=”data from CSV data file mapped and displayed by column”

Alt Text=”offline event data; column is edited by clicking the pencil icon”

Alt Text=”offline event data; accepted and matched events displayed”
Depending on the size of your file, it may take up to 15 minutes or longer to see your results in Events Manager and Facebook ads reporting.
Once you’ve uploaded your offline event data to your Events Manager, Facebook will match the data with the active ad campaigns assigned to the event set. You can now go to Ads Manager to see which events can be attributed to the people who saw or clicked on your Facebook ads.
As previously mentioned, the Offline Conversions API is one method of automating the data upload to your offline event set (the other being through a partner integration).
To use this API, you’ll need the following:
For more information on uploading offline event data via the Offline Conversions API, check out Facebook’s guide.
Facebook offers many partner integrations for tracking offline conversions. Implementing one of these partner integrations can help minimize repetitive manual tasks and facilitate the automatic uploading of offline event data.
Partners include:
For the complete list of partner integrations, check out Facebook’s list. You may either access the partner documentation, contact the partner directly for the integration setup, or visit the partner website for more information.
1. Go to Ads Manager and select the relevant tab—“Campaigns,” “Ad sets,” or “Ads” based on the results you want to view.
2. Select the “Columns” dropdown and choose “Offline Conversions” to view your offline conversion reporting.
3. If you wish to make changes to this view, select “Customize Columns” from the “Columns” dropdown and check the box for each metric you want to measure.
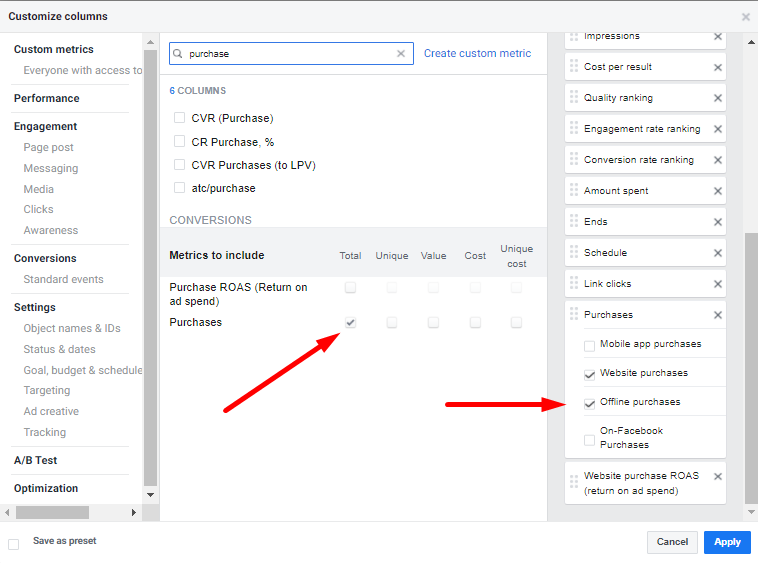
4. To save your customized selections as a preset, check the “Save as preset” box in the bottom-left corner and name your preset. Select “Apply.”
To ensure that you’re tracking all your website conversions and attributing them to the correct Facebook ads, you’ll need to set up as many tracking tools as possible.
Our latest service, known as Madgicx Cloud Tracking, will set up all of these tracking tools for you the right way, including enhanced conversions and Facebook's Conversions API Gateway, ensuring that you’re not missing out on conversions or over-tracking. The Conversions API Gateway is another way to get more conversion data using first-party cookies.
Our team of tracking experts will set up a first-party tracking system for you in 3 days, and the best part is that you can try it for 7 days free of charge!
Stop wasting money on inaccurate tracking. Get the only tracking system that sends accurate data back into your Ads Manager.

Michael is a Content Writer at Madgicx. He is passionate about crafting compelling content that educates Facebook advertisers, agency owners, and eCommerce entrepreneurs.


